Windows安装和使用zookeeper
本文介绍的 Zookeeper 是以 3.4.5 这个稳定版本为基础,最新的版本可以通过官网 http://hadoop.apache.org/zookeeper/来获取,Zookeeper 的安装非常简单,下面将从单机模式和集群模式两个方面介绍 Zookeeper 的Windows安装和配置.
CSDN下载地址:http://download.csdn.net/detail/javadxz/7484051
首先需要安装JdK,从Oracle的Java网站下载,安装很简单,就不再详述。
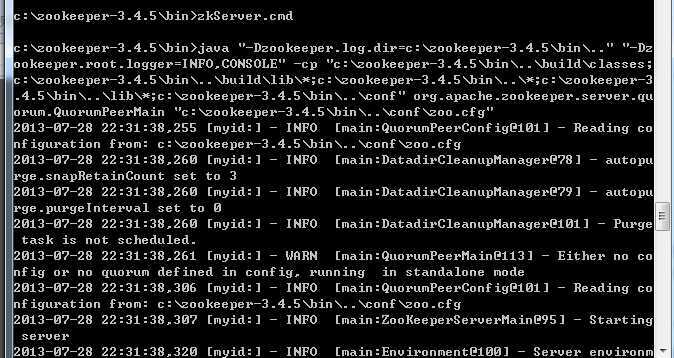
单机安装非常简单,只要获取到 Zookeeper 的压缩包并解压到某个目录如:C:\zookeeper-3.4.5\下,Zookeeper 的启动脚本在 bin 目录下,Windows 下的启动脚本是 bin目录下的zkServer.cmd。
在你执行启动脚本之前,还有几个基本的配置项需要配置一下,Zookeeper 的配置文件在 conf 目录下,这个目录下有 zoo_sample.cfg 和 log4j.properties,你需要做的就是将 zoo_sample.cfg 改名为 zoo.cfg,因为 Zookeeper 在启动时会找这个文件作为默认配置文件。下面详细介绍一下,这个配置文件中各个配置项的意义。
# The number of milliseconds of each tick
tickTime=2000
# The number of ticks that the initial
# synchronization phase can take
initLimit=10
# The number of ticks that can pass between
# sending a request and getting an acknowledgement
syncLimit=5
# the directory where the snapshot is stored.
# do not use /tmp for storage, /tmp here is just
# example sakes.
dataDir=C:\\zookeeper-3.4.5\\data
dataLogDir=C:\\zookeeper-3.4.5\\log
# the port at which the clients will connect
clientPort=2181
#
# Be sure to read the maintenance section of the
# administrator guide before turning on autopurge.
#
# http://zookeeper.apache.org/doc/current/zookeeperAdmin.html#sc_maintenance
#
# The number of snapshots to retain in dataDir
#autopurge.snapRetainCount=3
# Purge task interval in hours
# Set to "0" to disable auto purge feature
#autopurge.purgeInterval=1
- tickTime:这个时间是作为 Zookeeper 服务器之间或客户端与服务器之间维持心跳的时间间隔,也就是每个 tickTime 时间就会发送一个心跳。
- dataDir:顾名思义就是 Zookeeper 保存数据的目录,默认情况下,Zookeeper 将写数据的日志文件也保存在这个目录里。
- dataLogDir:顾名思义就是 Zookeeper 保存日志文件的目录
- clientPort:这个端口就是客户端连接 Zookeeper 服务器的端口,Zookeeper 会监听这个端口,接受客户端的访问请求。
当这些配置项配置好后,你现在就可以启动 Zookeeper 了,启动后要检查 Zookeeper 是否已经在服务,可以通过 netstat – ano 命令查看是否有你配置的 clientPort 端口号在监听服务。
Zookeeper 不仅可以单机提供服务,同时也支持多机组成集群来提供服务。实际上 Zookeeper 还支持另外一种伪集群的方式,也就是可以在一台物理机上运行多个 Zookeeper 实例,下面将介绍集群模式的安装和配置。
Zookeeper 的集群模式的安装和配置也不是很复杂,所要做的就是增加几个配置项。集群模式除了上面的三个配置项还要增加下面几个配置项:
initLimit=5
syncLimit=2
server.1=192.168.211.1:2888:3888
server.2=192.168.211.2:2888:3888
- initLimit:这个配置项是用来配置 Zookeeper 接受客户端(这里所说的客户端不是用户连接 Zookeeper 服务器的客户端,而是 Zookeeper 服务器集群中连接到 Leader 的 Follower 服务器)初始化连接时最长能忍受多少个心跳时间间隔数。当已经超过 10 个心跳的时间(也就是 tickTime)长度后 Zookeeper 服务器还没有收到客户端的返回信息,那么表明这个客户端连接失败。总的时间长度就是 5*2000=10 秒
- syncLimit:这个配置项标识 Leader 与 Follower 之间发送消息,请求和应答时间长度,最长不能超过多少个 tickTime 的时间长度,总的时间长度就是 2*2000=4 秒
- server.A=B:C:D:其中 A 是一个数字,表示这个是第几号服务器;B 是这个服务器的 ip 地址;C 表示的是这个服务器与集群中的 Leader 服务器交换信息的端口;D 表示的是万一集群中的 Leader 服务器挂了,需要一个端口来重新进行选举,选出一个新的 Leader,而这个端口就是用来执行选举时服务器相互通信的端口。如果是伪集群的配置方式,由于 B 都是一样,所以不同的 Zookeeper 实例通信端口号不能一样,所以要给它们分配不同的端口号。
- 除了修改 zoo.cfg 配置文件,集群模式下还要配置一个文件 myid,这个文件在 dataDir 目录下,这个文件里面就有一个数据就是 A 的值,Zookeeper 启动时会读取这个文件,拿到里面的数据与 zoo.cfg 里面的配置信息比较从而判断到底是那个 server。
Zookeeper 会维护一个具有层次关系的数据结构,它非常类似于一个标准的文件系统,如图 1 所示:
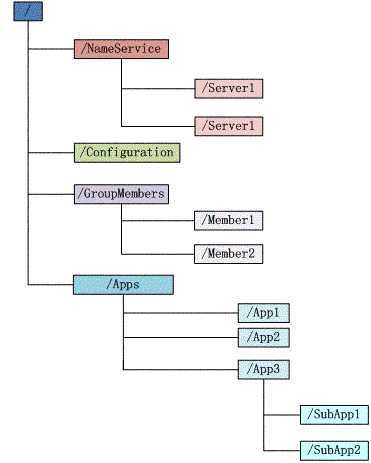
Zookeeper 这种数据结构有如下这些特点:
- 每个子目录项如 NameService 都被称作为 znode,这个 znode 是被它所在的路径唯一标识,如 Server1 这个 znode 的标识为 /NameService/Server1
- znode 可以有子节点目录,并且每个 znode 可以存储数据,注意 EPHEMERAL 类型的目录节点不能有子节点目录
- znode 是有版本的,每个 znode 中存储的数据可以有多个版本,也就是一个访问路径中可以存储多份数据
- znode 可以是临时节点,一旦创建这个 znode 的客户端与服务器失去联系,这个 znode 也将自动删除,Zookeeper 的客户端和服务器通信采用长连接方式,每个客户端和服务器通过心跳来保持连接,这个连接状态称为 session,如果 znode 是临时节点,这个 session 失效,znode 也就删除了
- znode 的目录名可以自动编号,如 App1 已经存在,再创建的话,将会自动命名为 App2
- znode 可以被监控,包括这个目录节点中存储的数据的修改,子节点目录的变化等,一旦变化可以通知设置监控的客户端,这个是 Zookeeper 的核心特性,Zookeeper 的很多功能都是基于这个特性实现的,后面在典型的应用场景中会有实例介绍
Zookeeper 作为一个分布式的服务框架,主要用来解决分布式集群中应用系统的一致性问题,它能提供基于类似于文件系统的目录节点树方式的数据存储,但是 Zookeeper 并不是用来专门存储数据的,它的作用主要是用来维护和监控你存储的数据的状态变化。通过监控这些数据状态的变化,从而可以达到基于数据的集群管理.
通过C#代码使用zookeeper
Zookeeper的使用主要是通过创建其Nuget ZooKeeperNet包下的Zookeeper实例,并且调用其接口方法进行的,主要的操作就是对znode的增删改操作,监听znode的变化以及处理。
using System;
using System.Collections.Generic;
using System.Linq;
using System.Text;
using ZooKeeperNet;

namespace ZookeeperDemo
{
    class Watcher : IWatcher
    {
        public void Process(WatchedEvent @event)
        {
            if (@event.Type == EventType.NodeDataChanged)
            {
                Console.WriteLine(@event.Path);
            }
        }
    }
}
using System;
using System.Collections.Generic;
using System.Linq;
using System.Text;
using ZooKeeperNet;

namespace ZookeeperDemo
{
    class Program
    {
        static void Main(string[] args)
        {

            //创建一个Zookeeper实例,第一个参数为目标服务器地址和端口,第二个参数为Session超时时间,第三个为节点变化时的回调方法
            using (ZooKeeper zk = new ZooKeeper("127.0.0.1:2181", new TimeSpan(0, 0, 0, 50000), new Watcher()))
            {
                var stat = zk.Exists("/root",true);

                ////创建一个节点root,数据是mydata,不进行ACL权限控制,节点为永久性的(即客户端shutdown了也不会消失)
                //zk.Create("/root", "mydata".GetBytes(), Ids.OPEN_ACL_UNSAFE, CreateMode.Persistent);

                //在root下面创建一个childone znode,数据为childone,不进行ACL权限控制,节点为永久性的
                zk.Create("/root/childone", "childone".GetBytes(), Ids.OPEN_ACL_UNSAFE, CreateMode.Persistent);
                //取得/root节点下的子节点名称,返回List<String>
                zk.GetChildren("/root", true);
                //取得/root/childone节点下的数据,返回byte[]
                zk.GetData("/root/childone", true, null);

                //修改节点/root/childone下的数据,第三个参数为版本,如果是-1,那会无视被修改的数据版本,直接改掉
                zk.SetData("/root/childone", "childonemodify".GetBytes(), -1);
                //删除/root/childone这个节点,第二个参数为版本,-1的话直接删除,无视版本
                zk.Delete("/root/childone", -1);
            }

        }
    }
}
浅析
创建连接:
1.获取服务主机列表
2.设置超时时间
3.注册客户端事件
4.以线程安全的方式创建请求连接(启动客户端请求队列,循环队列基于socket通信、根据请求类型执行不同的请求动作)
请求流程:
构造请求头、构造request,reponse、构造响应头、构造Packet对象,packet对象准备好后,把整个对象放入一个outgoingQueue
packet被放入outgoingQueue中,等待SendThread把packet对应的内容发送给server。server处理分3步在doio方法中ReadLength ReadConnectResult ReadResponse,直到ReadResponse方法中确定packet请求结束。
响应流程:
针对心跳的ping请求的resp,针对auth请求的resp,一般接口请求的resp,如果接口请求要求了watcher,当watcher关注的内容有变化时的notification
锁相关部分API方法:
创建节点:create
demo:zk.Create(Dir, severname.GetBytes(), Ids.OPEN_ACL_UNSAFE, CreateMode.Persistent);
其中CreateMode分为4类Persistent、PersistentSequential、Ephemeral、EphemeralSequential
PERSISTENT 创建持久化节点,对应机器关闭连接后节点/数据不会消失
PERSISTENT_SEQUENTIAL 如果PATH是以’/’结尾则以这个PATH作为父节点,创建一个子节点,其子节点名字是一个按先后顺序排列的数值;否则创建一个名字是‘/’后面字符加上先后顺序排列的数值字符串的节点,同样创建持久节点
EPHEMERAL 创建瞬时节点,Zookeeper在感知连接机器宕机后会清除它创建的瞬时节点
EPHEMERAL_SEQUENTIAL 穿件瞬时顺序节点,和PERSISTENT_SEQUENTIAL一样,区别在于它是瞬时的
删除节点 delete
demo :zk.Delete(Dir, -1);
前一个参数代表节点名称(一般用作路径),后一个是版本号 -1表示全匹配
查看节点 exists
demo : zk.Exists(Dir, new MyWatch2());
获取数据 getData
demo :zk.GetData(Dir, new MyWatch2(), stat);
获取一个节点的数据,可注入watcher
设置数据 setData
demo : zk.SetData(Dir, new byte[1], 1);
获取下级节点集合 GetChildren
demo :zk.GetChildren(Dir, true);
存储
znodes类似文件和目录。但它不是一个典型的文件系统,zookeeper数据保存在内存中,这意味着zookeeper可以实现高吞吐量和低延迟。
watcher
Zookeeper有两种watches,一种是data watches,另一种是child watches。其中,getData()和exists()以及create()等会添加data watches,getChildren()会添加child watches。而delete()涉及到删除数据和子节点,会同时触发data watches和child watches。
示例代码下载:ZookeeperDemo.zip