
nginx常见应用技术
时间:2014-12-28 23:37:45
收藏:0
阅读:476
一、Nginx 基础知识
1、简介
Nginx ("engine x") 是一个高性能的HTTP和反向代理 服务器,也是一个IMAP/POP3/SMTP代理服务器。Nginx 是由 Igor Sysoev 为俄罗斯访问量第二的Rambler.ru站点开发的,它已经在该站点运行超过三年时间。
Nginx是以类BSD许可证的形式发布的。在国内,已经有新浪博客、新浪播客、网易新闻、56.com、Discuz官方论坛、水木社区、豆瓣、迅雷在线等多家网站使用Nginx作为WEB服务器或反向代理服务器。
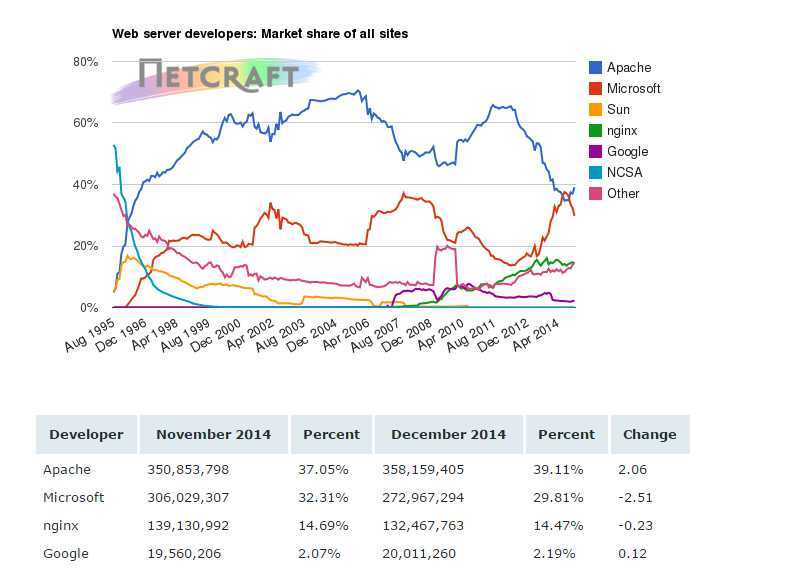
图下是Netcraft公司统计的从1995年8月至2014年12月各web服务器的市场占有率曲线图:
2、 Nginx的优点
nginx做为HTTP服务器,有以下几项基本特性:
1) 处理静态文件,索引文件以及自动索引;打开文件描述符缓冲.
2) 无缓存的反向代理加速,简单的负载均衡和容错.
3) FastCGI,简单的负载均衡和容错.
4) 模块化的结构。包括gzipping,byteranges,chunkedresponses, 以及 SSI-filter等filter。如果由FastCGI或其它代理服务器处理单页中存在的多个SSI,则这项处理可以并行运行,而不需要相互等待。
5) 支持SSL 和 TLS SNI.
Nginx专为性能优化而开发,性能是其最重要的考量, 实现上非常注重效率 。它支持内核Poll模型,能经受高负载的考验, 官方测试Nginx能够支撑5W并发连接,在实际生产环境中可支撑2~4W并发连接数。
Nginx具有很高的稳定性。其它HTTP服务器,当遇到访问的峰值,或者有人恶意发起慢速连接时,也很可能会导致服务器物理内存耗尽频繁交换,失去响应,只能重启服务器。例如当前apache一旦上到200个以上进程,web响应速度就明显非常缓慢了。而Nginx采取了分阶段资源分配技术,使得它的CPU与内存占用率非常低。nginx官方表示保持10,000个没有活动的连接,它只占2.5M内存,所以类似DOS这样的攻击对nginx来说基本上是毫无用处的。就稳定性而言, nginx比lighthttpd更胜一筹。
Nginx支持热部署。它的启动特别容易, 并且几乎可以做到7*24不间断运行,即使运行数个月也不需要重新启动。你还能够在不间断服务的情况下,对软件版本进行进行升级。
Nginx采用master-slave模型, 能够充分利用SMP的优势,且能够减少工作进程在磁盘I/O的阻塞延迟。当采用select()/poll()调用时,还可以限制每个进程的连接数。
Nginx代码质量非常高,代码很规范, 手法成熟, 模块扩展也很容易。特别值得一提的是强大的Upstream与Filter链。Upstream为诸如reverseproxy, 与其他服务器通信模块的编写奠定了很好的基础。而Filter链最酷的部分就是各个filter不必等待前一个filter执行完毕。它可以把前一个filter的输出做为当前filter的输入,这有点像Unix的管线。这意味着,一个模块可以开始压缩从后端服务器发送过来的请求,且可以在模块接收完后端服务器的整个请求之前把压缩流转向客户端。
Nginx能够选择高效的epoll(Linux 2.6内核)、kqueue(Free BSD)、eventport(Solaris 10)作为网络I/O模型,在高连接连接并发的情况下,它能够支持高达50000个并发连接数的响应,而内存、CPU等系统资源消耗却非常低,运行非常稳定。
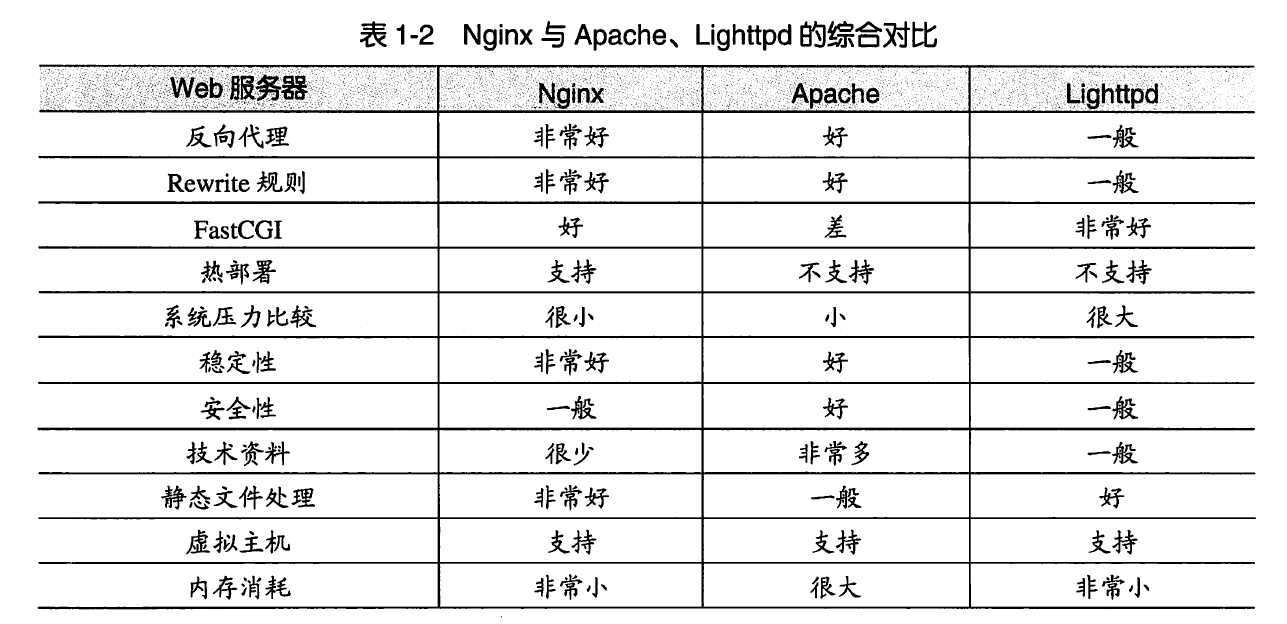
下图是Nginx与Apache、Lighttpd的综合对比,来自《实战Nginx 取代Apache的高性能web服务器》
二、Nginx编译安装及调试
1、编译安装Nginx
环境:CentOS 6.6 X86_64位, 源码包 nginx-1.6.2.tar.gz
编译安装nginx需要事先需要安装开发包组"Development Tools"和 "Development Libraries"。同时,还需要专门安装pcre-devel包:
-
yum -y groupinstall "Development Tools" "Development Libraries"
yum -y install pcre-devel
yum install openssl-devel #要开启SSL模块就必须要装这个包
源码包需要到官网下载 http://nginx.org/en/download.html
Nginx编译:
ntpdate 172.16.0.1                  #编译前先校准时间
tar xf nginx-1.6.2.tar.gz            #解压
cd nginx-1.6.2
groupadd -r -g 108 nginx           #新建nginx组和用户
useradd -r -g 108-u 108 nginx
常用编译配置介绍参考:- http://www.cnblogs.com/qq354381577/p/97515e22e27147bf3b3dad49696ec607.html
-
开始编译安装配置
./configure --prefix=/usr/local/nginx --conf-path=/etc/nginx/nginx.conf --user=nginx --group=nginx --error-log-path=/var/log/nginx/error.log --http-log-path=/var/log/nginx/access.log --pid-path=/var/run/nginx/nginx.pid --lock-path=/var/lock/nginx.lock --with-http_ssl_module --with-http_flv_module --with-http_stub_status_module --with-http_gzip_static_module --http-client-body-temp-path=/var/tmp/nginx/client/ --http-proxy-temp-path=/var/tmp/nginx/proxy/ --http-fastcgi-temp-path=/var/tmp/nginx/fcgi/ --with-file-aio
make && make install
-
编译完成后,先检查配置文件是否有问题
/usr/local/nginx/sbin/nginx -t                           # 检查是否有问题
mkdir -pv /var/tmp/nginx/{client,proxy,fastcgi}          # 新建目录
/usr/local/nginx/sbin/nginx -t                           # 再次测试
    nginx: the configuration file /etc/nginx/nginx.conf syntax is ok
    nginx: configuration file /etc/nginx/nginx.conf test is successful # 出现这两行就是提示就没问题
/usr/local/nginx/sbin/nginx                              # 启动nginx
[root@null nginx-1.6.2]# ss -tnl | grep 80               # 查看是否启用nginx
LISTEN 0128*:80*:*
/usr/local/nginx/html/                                   # 网页默认路径在安装目录下的html目录下
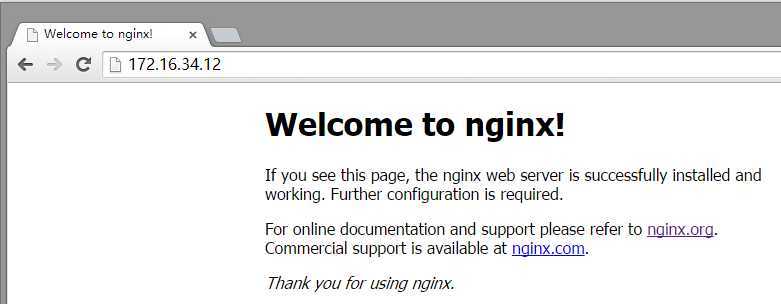
输入地址访问,安装完成。
2、为nginx提供SysV init脚本和环境变量
-
新建文件/etc/rc.d/init.d/nginx,内容如下:
#!/bin/sh
#
# nginx - this script starts and stops the nginx daemon
#
# chkconfig: - 85 15
# description: Nginx is an HTTP(S) server, HTTP(S) reverse # proxy and IMAP/POP3 proxy server
# processname: nginx
# config: /etc/nginx/nginx.conf
# config: /etc/sysconfig/nginx
# pidfile: /var/run/nginx.pid
# Source function library.
./etc/rc.d/init.d/functions
# Source networking configuration.
./etc/sysconfig/network
# Check that networking is up.
["$NETWORKING"="no"]&& exit 0
nginx="/usr/local/nginx/sbini/nginx"
prog=$(basename $nginx)
NGINX_CONF_FILE="/etc/nginx/nginx.conf"
[-f /etc/sysconfig/nginx ]&&./etc/sysconfig/nginx
lockfile=/var/lock/subsys/nginx
make_dirs(){
# make required directories
user=`nginx -V 2>&1 | grep "configure arguments:" | sed ‘s/[^*]*--user=\([^ ]*\).*/\1/g‘ -`
options=`$nginx -V 2>&1 | grep ‘configure arguments:‘`
for opt in $options;do
if[`echo $opt | grep ‘.*-temp-path‘`];then
value=`echo $opt | cut -d "=" -f 2`
if[!-d "$value"];then
# echo "creating" $value
mkdir -p $value && chown -R $user $value
fi
fi
done
}
start(){
[-x $nginx ]|| exit 5
[-f $NGINX_CONF_FILE ]|| exit 6
make_dirs
echo -n $"Starting $prog: "
daemon $nginx -c $NGINX_CONF_FILE
retval=$?
echo
[ $retval -eq 0]&& touch $lockfile
return $retval
}
stop(){
echo -n $"Stopping $prog: "
killproc $prog -QUIT
retval=$?
echo
[ $retval -eq 0]&& rm -f $lockfile
return $retval
}
restart(){
configtest ||return $?
stop
sleep 1
start
}
reload(){
configtest ||return $?
echo -n $"Reloading $prog: "
killproc $nginx -HUP
RETVAL=$?
echo
}
force_reload(){
restart
}
configtest(){
$nginx -t -c $NGINX_CONF_FILE
}
rh_status(){
status $prog
}
rh_status_q(){
rh_status >/dev/null 2>&1
}
case"$1"in
start)
rh_status_q && exit 0
$1
;;
stop)
rh_status_q || exit 0
$1
;;
restart|configtest)
$1
;;
reload)
rh_status_q || exit 7
$1
;;
force-reload)
force_reload
;;
status)
rh_status
;;
condrestart|try-restart)
rh_status_q || exit 0
;;
*)
echo $"Usage: $0 {start|stop|status|restart|condrestart|try-restart|reload|force-reload|configtest}"
exit 2
esac
-
chmod +x /etc/rc.d/init.d/nginx                            # 为nginx添加执行权限
chkconfig --add nginx                                      # 添加到系统服务
service nginx start                                        # 可以启动nginx服务了

输入命令启动nginx,当然直接启动Nginx服务,如不需要这一步可以省略
vim /etc/profile.d/nginx.sh                                # 在/etc/profile.d/添加环境变量nginx.sh文件
export PATH=/usr/local/nginx/sbin:$PATH                    # 输入以下内容
./etc/profile.d/nginx.sh                                   # 重读nginx.sh文件
-
附带:常见脚本控制命令
start|stop|status|restart|condrestart|try-restart|reload|force-reload|configtest
start:开启
stop:关闭
status:查看是否开启
restart:重启服务
reload:重读配置文件
-
Nginx启动与停止
Nginx启动:经过以上配置,可以直接输入nginx、/usr/local/nginx/sbin/nginx、service nginx stast三种方法

Nginx停止:
格式:kill -信号类型‘/var/run/nginx/nginx.pid‘
  1)从容停止Nginx。
        kill - QUIT nginx主进程号
        或 kill - QUIT‘/var/run/nginx/nginx.pid‘
   2)快速停止Nginx
        kill - TERM nginx主进程号
        kill - TERM‘/var/run/nginx/nginx.pid‘
        或
        kill - INT nginx主进程号
        kill - INT ‘/var/run/nginx/nginx.pid‘
   3)强行停止所有Nginx进程
        pkill -9 nginx
        或killall nginx
3、Nginx配置文件详解:
1、为nginx.conf着色
由于vim打开nginx.conf没有着色,所以编辑起来很不方便,使用nginx.vim插件就可以着色了

安装方法:
下载
将nginx.vim 放置于~/.vim/syntax/目录
配置nginx.vim
而后在~/.vim/filetype.vim中添加如下行:
au BufRead,BufNewFile/etc/nginx/*,/usr/local/nginx/conf/*if&ft ==‘‘| setfiletype nginx | endif
其中“/etc/nginx”为nginx配置文件的目录。
-
[root@null ~]# mkdir -pv .vim/syntax 新建文件夹
mkdir: created directory `.vim‘
mkdir: created directory `.vim/syntax‘
[root@null ~]# cd .vim/syntax/
[root@null syntax]# mv ~/nginx.vim .
[root@null syntax]# vim nginx.vim 新建文件
au BufRead,BufNewFile /etc/nginx/*,/usr/local/nginx/conf/* if &ft == ‘‘ | setfiletype nginx | endif 插入以下文件
[root@null syntax]# vim /etc/nginx/nginx.conf 现在打开文件就有颜色了
2、nginx配置文件详解
-
vim /etc/nginx/nginx.conf                                     # 打开配置文件
#user nobody;                                                 # 使用的用户和组,编译时已经指定,所以注释掉了
worker_processes 1;                                           # 指定工作衍生的进程数(一般等于CPU的总核数或总核数的两倍,例如两个四核CPU,则总和数为8)
#error_log logs/error.log;                                    # 指定错误日志存放的路径,错误日志级别可选项为:[ debug | info | notice | warn | error | crit]
#error_log logs/error.log notice;
#error_log logs/error.log info;
#pid logs/nginx.pid;                                          # 指定pid存放的路径
events {
worker_connections 1024;                                      # 允许的连接数
}
http {                                                        # 设定http服务器
include mime.types;                                           # 文件扩展名与文件类型映射表
default_type application/octet-stream;                        # 默认文件类型
#log_format main ‘$remote_addr - $remote_user [$time_local] "$request" ‘
# ‘$status $body_bytes_sent "$http_referer" ‘
# ‘"$http_user_agent" "$http_x_forwarded_for"‘;
#access_log logs/access.log main;
sendfile on;                                                  # 开启高效文件传输模式,sendifile指定指定nginx是否调用sendfile函数来输出文件,对于普通段设为On,如果用来进行下载等应用IO重负载应用,可设置为off,以平衡磁盘与网络I/O处理速度,降低系统的负载。注意:如果图片显示不正常把这个改成off。
#tcp_nopush on;                                               # 防止网络阻塞

#keepalive_timeout 0;
keepalive_timeout 65;                                         # 长连接超时事件,单位为秒
#gzip on;                                                     # 开启gzip压缩输出
server {                                                      # 虚拟主机配置
listen 80;                                                    # 监听端口
server_name localhost;                                        # 域名可以有多个,用空格隔开
#charset koi8-r;
#access_log logs/host.access.log main;                        # 设置单个虚拟主机访问日志

location /{
root html;
index index.html index.htm;                                   # 指定虚拟主机首页文件
}
#error_page 404 /404.html;                                    # 指定错误404的网页文件
# redirect server error pages to the static page /50x.html    # 重定向服务器错误页面为静态页面
#
error_page 500502503504/50x.html;
location =/50x.html {
root html;
}
# proxy the PHP scripts to Apache listening on 127.0.0.1:80
#
#location ~ \.php$ {
# proxy_pass http://127.0.0.1;
#}
# pass the PHP scripts to FastCGI server listening on 127.0.0.1:9000
#
#location ~ \.php$ {
# root html;
# fastcgi_pass 127.0.0.1:9000;
# fastcgi_index index.php;
# fastcgi_param SCRIPT_FILENAME /scripts$fastcgi_script_name;
# include fastcgi_params;
#}
# deny access to .htaccess files, if Apache‘s document root
# concurs with nginx‘s one
#
#location ~ /\.ht {
# deny all;
#}
}
# listen 8000;
# listen somename:8080;
# server_name somename alias another.alias;
# location / {
# root html;
# index index.html index.htm;
# }
#}
# HTTPS server                                                    # https 服务
#
#server {
# listen 443 ssl;                                                 # 端口
# server_name localhost;                                          # 主机名
# ssl_certificate cert.pem;                                       # 证书文件路径
# ssl_certificate_key cert.key;                                   # 密钥文件路径
# ssl_session_cache shared:SSL:1m;
# ssl_session_timeout 5m;
# ssl_ciphers HIGH:!aNULL:!MD5;
# ssl_prefer_server_ciphers on;
# location / {
# root html;
# index index.html index.htm;
# }
#}
}
通过上面的nginx.conf配置文件示例,可以看出,nginx.conf的配置文件结构主要由以下几部分构成
-
http {
    upstream {
        ....
    }

    server {
        listen IP:PORT;
        # 虚拟主机
        location /URL {
            if...{
                ...
            }
            root "/path/to/somewhere";
            ...
         }
    }

    server {
         ...
    }
}
-
配置文件:
    main配置段              主配置段
    http {
    }                      http相关配置段

    配置指令要以分号结尾,语法格式:
        directive value1 [value2...];

    支持使用变量:
        模块内置变量
        自定义变量
            set var_name value

    主配置段的指令的类别:
        用于调试、定位问题
        正常运行必备的配置
        优化性能的配置
        事件相关的配置

    正常运行的必备配置:
        1、user USERNAME [GROUPNAME];
            指定运行worker进程的用户 和组,例如:
            user nginx nginx;s

        2、pid /path/to/pid_file;
            指定nginx的pid文件;

        3、worker_rlimit_nofile #;
            指定一个worker进程所能够打开的最大文件句柄数;

        4、worker_rlimit_sigpending #;
            指定每个用户能够发往worker的信号的数量;

    优化性能相关的配置:
        1、worker_processes #:
            worker线程的个数;通常应该为物理CPU核心个数减1;

        2、worker_cpu_affinity cpumask ...;
            绑定worker进程至指定的CPU上;
                CPUMASK
                    0001
                    0010
                    0100
                    1000
                例如:
                    worker_cpu_affinity 00000001 00000010 00000100;

        3、timer_resolution t;
            gettimeofday();

        4、worker_priority nice;
            -20, 19

    事件相关的配置:
        1、accept_mutex [on|off]
            内部调用用户 请求至各worker时用的负载均衡锁;打开时表示能让多个worker轮流地、序列化地与响应新请求;

        2、lock_file /path/to/lock_file;

        3、accept_mutex_delay #ms;

        4、use [epoll|rgsig|select|poll];
            定义使用的事件模型;建议让Nginx自动选择;

        5、worker_connections #;
            每个worker进程所能够响应的最大并发请求数;

    用于调试、定位问题:
        1、daemon [off|on]
            是否以守护进程方式启动nginx;

        2、master_process on|off;
            是否以master/worker模型来运行nginx;

        3、error_log /path/to/error_log level;
            错误日志文件及其级别;出于调试的目的,可以使用debug级别,但此级别只有在编译nginx时使用了--with-debug选项才有效;
附件列表
未完待续。。。。
评论(0)