【tf.keras】官方教程二 函数式API
官方教程:https://tensorflow.google.cn/guide/keras/functional#training_evaluation_and_inference
搭建简单模型
Setup
导入需要的模块:
1 from __future__ import absolute_import, division, print_function, unicode_literals
2
3 import numpy as np
4
5 import tensorflow as tf
6
7 from tensorflow import keras
8 from tensorflow.keras import layers
Introduction
什么是Keras 函数式API呢?它相对于tf.keras.Sequential API有什么优势呢?
Keras 函数式API是生成模型的一种方式,其相对于tf.keras.Sequential API更加灵活。函数式 API可以处理具有非线性拓扑结构的模型、具有共享层的模型以及具有多个输入或输出的模型。
深度学习模型的主要思想是层次的有向无环图(DAG)。因此,函数式API是一种构建层图的方法。
例如构建一个如下网络,包含3个全连接层的分类问题。
(input: 784-dimensional vectors)
       ?
[Dense (64 units, relu activation)]
       ?
[Dense (64 units, relu activation)]
       ?
[Dense (10 units, softmax activation)]
       ?
(output: logits of a probability distribution over 10 classes)
使用函数式API的步骤:
- 首先生成一个输入节点:
inputs = keras.Input(shape=(784,))
如果输入的是shape为(32,32,3)的图像,可以通过如下方式生成输入节点:
1 # Just for demonstration purposes.
2 img_inputs = keras.Input(shape=(32, 32, 3))
上述生成的inputs中包含shape和dtype等信息:
1 inputs.shape
2 inputs.dtype
会返回如下信息:
TensorShape([None, 784])
tf.float32
- 在层的图(graph of layers)中生成新的节点,并通过inputs进行回调。
1 dense = layers.Dense(64, activation=‘relu‘)
2  x = dense(inputs)
上述操作,相当于将输入inputs输入到了创建的dense层中,并返回输出x;其实可以将上述代码简化为一行。
- 添加第二个层节点和第三个层节点,同样采用的是上述的方式。
1 x = layers.Dense(64, activation=‘relu‘)(x)
2 outputs = layers.Dense(10)(x)
- 此时,可以通过在层图中指定其输入和输出来创建最终的模型:
model = keras.Model(inputs=inputs, outputs=outputs, name=‘mnist_model‘)
通过keras.Model()方法,结合输入、输出,整合成为最终的模型。
- 生成模型以后,可以打印构建的模型, 就像paper中模型结构的表格:
model.summary()
Model: "mnist_model"
_________________________________________________________________
Layer (type)                 Output Shape              Param #
=================================================================
input_1 (InputLayer)         [(None, 784)]             0
_________________________________________________________________
dense (Dense)                (None, 64)                50240
_________________________________________________________________
dense_1 (Dense)              (None, 64)                4160
_________________________________________________________________
dense_2 (Dense)              (None, 10)                650
=================================================================
Total params: 55,050
Trainable params: 55,050
Non-trainable params: 0
_________________________________________________________________
-
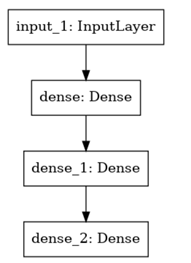
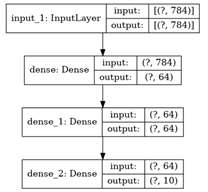
同时,也可以绘制模型结构的图像:
- 仅显示模型结构:
keras.utils.plot_model(model, ‘my_first_model.png‘)

- 显示模型结构和输入输出的尺寸:【添加参数show_shapes=True】
1 keras.utils.plot_model(model, ‘my_first_model_with_shape_info.png‘, show_shapes=True)

训练、验证和推理
这一部分与Sequential models的处理方式相同。
下述是使用mnist数据集,进行训练、验证和测试:
 1 (x_train, y_train), (x_test, y_test) = keras.datasets.mnist.load_data()
 2
 3 x_train = x_train.reshape(60000, 784).astype(‘float32‘) / 255
 4 x_test = x_test.reshape(10000, 784).astype(‘float32‘) / 255
 5
 6 model.compile(loss=keras.losses.SparseCategoricalCrossentropy(from_logits=True),
 7               optimizer=keras.optimizers.RMSprop(),
 8               metrics=[‘accuracy‘])
 9
10 history = model.fit(x_train, y_train,
11                     batch_size=64,
12                     epochs=5,
13                     validation_split=0.2)
14
15 test_scores = model.evaluate(x_test, y_test, verbose=2)
16 print(‘Test loss:‘, test_scores[0])
17 print(‘Test accuracy:‘, test_scores[1])
训练和验证的详细指南详见:https://tensorflow.google.cn/guide/keras/train_and_evaluate
模型的保存与恢复
对于模型的保存,函数式API的方式与序列化模型也是一致的。标准的方式是通过model.save()进行模型的保存, keras.models.load_model()进行模型的恢复。
保存的文件中包含:
- 模型的结构
- 模型的权重
- 模型的训练配置参数
- 优化器和它的状态
1 model.save(‘path_to_my_model‘)
2 del model
3 # Recreate the exact same model purely from the file:
4 model = keras.models.load_model(‘path_to_my_model‘)
模型的保存与恢复指南详见:https://tensorflow.google.cn/guide/keras/save_and_serialize
使用相同的层图来定义多个模型
在函数式API中,模型的产生是通过具体化它们的输入和输出【keras.Model(inputs=, outputs=)】这就意味着,一个层图可以被利用产生多个模型。(通过不同的输入和输出)
以下代码包含encoder 和 decoder两部分,encoder相当于FCN的卷积过程,decoder相当于FCN的反卷积过程。
也就是说,Conv2D层与Conv2DTranspose互为反操作;MaxPooling2D与UpSampling2D互为反操作。卷积与反卷积,池化与反池化。
 1 encoder_input = keras.Input(shape=(28, 28, 1), name=‘img‘)
 2 x = layers.Conv2D(16, 3, activation=‘relu‘)(encoder_input)
 3 x = layers.Conv2D(32, 3, activation=‘relu‘)(x)
 4 x = layers.MaxPooling2D(3)(x)
 5 x = layers.Conv2D(32, 3, activation=‘relu‘)(x)
 6 x = layers.Conv2D(16, 3, activation=‘relu‘)(x)
 7 encoder_output = layers.GlobalMaxPooling2D()(x)
 8
 9 encoder = keras.Model(encoder_input, encoder_output, name=‘encoder‘)
10 encoder.summary()
11
12 x = layers.Reshape((4, 4, 1))(encoder_output)
13 x = layers.Conv2DTranspose(16, 3, activation=‘relu‘)(x)
14 x = layers.Conv2DTranspose(32, 3, activation=‘relu‘)(x)
15 x = layers.UpSampling2D(3)(x)
16 x = layers.Conv2DTranspose(16, 3, activation=‘relu‘)(x)
17 decoder_output = layers.Conv2DTranspose(1, 3, activation=‘relu‘)(x)
18
19 autoencoder = keras.Model(encoder_input, decoder_output, name=‘autoencoder‘)
20 autoencoder.summary()
值得注意的是,上述代码是在encoder的基础上,再建立decoder。建立decoder时,使用的是encoder模型的输入和decoder的输出作为keras.Model的输入参数。也就是所谓的end2end,端到端操作。
所有的模型都是可调用的,就像层一样
可以通过调用输入或另一层的输出,将任何模型视为一个层。通过调用模型,不仅重用了模型的体系结构,还重用了它的权重。
为了看到它的作用,这里有一个不同的自动编码器的例子,它创建了一个编码器模型,一个解码器模型,并在两个调用中链接它们,以获得自动编码器模型:
之前的模型是通过使用encoder模型的输入作为decoder的输入,从而达到端到端的模型建立。当然,也可以建立decoder模型的输入,通过两个模型的调用达到端到端模型的实现。
如下述代码第12行,构建了decoder模型的输入;
23-26行,通过新建一个自动编码器的输入autoencoder_input,再通过两个模型的分别调用(如同层的调用一样),26行可以再次建立模型。 模型可以像层一样调用,生成新的模型(keras.Model(inputs, outputs))。
 1 encoder_input = keras.Input(shape=(28, 28, 1), name=‘original_img‘)
 2 x = layers.Conv2D(16, 3, activation=‘relu‘)(encoder_input)
 3 x = layers.Conv2D(32, 3, activation=‘relu‘)(x)
 4 x = layers.MaxPooling2D(3)(x)
 5 x = layers.Conv2D(32, 3, activation=‘relu‘)(x)
 6 x = layers.Conv2D(16, 3, activation=‘relu‘)(x)
 7 encoder_output = layers.GlobalMaxPooling2D()(x)
 8
 9 encoder = keras.Model(encoder_input, encoder_output, name=‘encoder‘)
10 encoder.summary()
11
12 decoder_input = keras.Input(shape=(16,), name=‘encoded_img‘)
13 x = layers.Reshape((4, 4, 1))(decoder_input)
14 x = layers.Conv2DTranspose(16, 3, activation=‘relu‘)(x)
15 x = layers.Conv2DTranspose(32, 3, activation=‘relu‘)(x)
16 x = layers.UpSampling2D(3)(x)
17 x = layers.Conv2DTranspose(16, 3, activation=‘relu‘)(x)
18 decoder_output = layers.Conv2DTranspose(1, 3, activation=‘relu‘)(x)
19
20 decoder = keras.Model(decoder_input, decoder_output, name=‘decoder‘)
21 decoder.summary()
22
23 autoencoder_input = keras.Input(shape=(28, 28, 1), name=‘img‘)
24 encoded_img = encoder(autoencoder_input)
25 decoded_img = decoder(encoded_img)
26 autoencoder = keras.Model(autoencoder_input, decoded_img, name=‘autoencoder‘)
27 autoencoder.summary()
上述模型嵌套的方式在集成算法中比较常见,一堆弱学习机(Model)的再次组合。
下述代码真是一个简单粗暴的感知机集成模型,get_model()中为一个包含128个节点的输入层和包含1个节点的输出层构成的感知机模型。代码10-15行为集成模型的构建,同样的输入,平均的输出。
 1 def get_model():
 2   inputs = keras.Input(shape=(128,))
 3   outputs = layers.Dense(1)(inputs)
 4   return keras.Model(inputs, outputs)
 5
 6 model1 = get_model()
 7 model2 = get_model()
 8 model3 = get_model()
 9
10 inputs = keras.Input(shape=(128,))
11 y1 = model1(inputs)
12 y2 = model2(inputs)
13 y3 = model3(inputs)
14 outputs = layers.average([y1, y2, y3])
15 ensemble_model = keras.Model(inputs=inputs, outputs=outputs)
操作复杂的图拓扑
通过以上的介绍,或许你觉得keras 函数式API和Sequence API相比并没有什么亮点。那是因为上述的模型结构还相对简单。 接下来,在多输入多输出模型 和 共享层中探究其精妙之处。
多输入多输出模型
函数式API可以容易的解决多输入和多输出的问题。而这在Sequential API中很难处理。
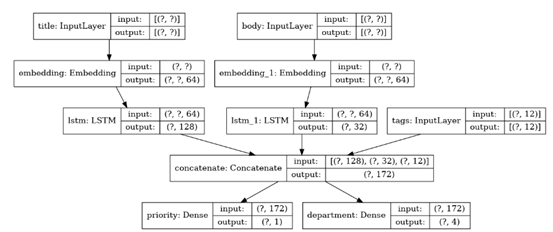
下述代码包含两个输入,两个输入分别经过LSTM产生输出后,利用特征拼接形成一个特征。再对该特征进行分别两个全连接操作,产生两个输出。而最终构成的模型。
 1 num_tags = 12  # Number of unique issue tags
 2 num_words = 10000  # Size of vocabulary obtained when preprocessing text data
 3 num_departments = 4  # Number of departments for predictions
 4
 5 title_input = keras.Input(shape=(None,), name=‘title‘)  # Variable-length sequence of ints
 6 body_input = keras.Input(shape=(None,), name=‘body‘)  # Variable-length sequence of ints
 7 tags_input = keras.Input(shape=(num_tags,), name=‘tags‘)  # Binary vectors of size `num_tags`
 8
 9 # Embed each word in the title into a 64-dimensional vector
10 title_features = layers.Embedding(num_words, 64)(title_input)
11 # Embed each word in the text into a 64-dimensional vector
12 body_features = layers.Embedding(num_words, 64)(body_input)
13
14 # Reduce sequence of embedded words in the title into a single 128-dimensional vector
15 title_features = layers.LSTM(128)(title_features)
16 # Reduce sequence of embedded words in the body into a single 32-dimensional vector
17 body_features = layers.LSTM(32)(body_features)
18
19 # Merge all available features into a single large vector via concatenation
20 x = layers.concatenate([title_features, body_features, tags_input])
21
22 # Stick a logistic regression for priority prediction on top of the features
23 priority_pred = layers.Dense(1, name=‘priority‘)(x)
24 # Stick a department classifier on top of the features
25 department_pred = layers.Dense(num_departments, name=‘department‘)(x)
26
27 # Instantiate an end-to-end model predicting both priority and department
28 model = keras.Model(inputs=[title_input, body_input, tags_input],
29                     outputs=[priority_pred, department_pred])
显示其模型结构,包含三个输入,两个输出:

在编译模型是,由于模型包含两个输出,可以为两个模型分别设置损失函数。
1 model.compile(optimizer=keras.optimizers.RMSprop(1e-3),
2               loss=[keras.losses.BinaryCrossentropy(from_logits=True),
3                     keras.losses.CategoricalCrossentropy(from_logits=True)],
4               loss_weights=[1., 0.2])
为了代码的可读性,在设定损失函数时可以使用字典的方式,用于声明每个损失函数的归属。
1 model.compile(optimizer=keras.optimizers.RMSprop(1e-3),
2               loss={‘priority‘:keras.losses.BinaryCrossentropy(from_logits=True),
3                     ‘department‘: keras.losses.CategoricalCrossentropy(from_logits=True)},
4               loss_weights=[1., 0.2])
训练模型:
 1 # Dummy input data
 2 title_data = np.random.randint(num_words, size=(1280, 10))
 3 body_data = np.random.randint(num_words, size=(1280, 100))
 4 tags_data = np.random.randint(2, size=(1280, num_tags)).astype(‘float32‘)
 5
 6 # Dummy target data
 7 priority_targets = np.random.random(size=(1280, 1))
 8 dept_targets = np.random.randint(2, size=(1280, num_departments))
 9
10 model.fit({‘title‘: title_data, ‘body‘: body_data, ‘tags‘: tags_data},
11           {‘priority‘: priority_targets, ‘department‘: dept_targets},
12           epochs=2,
13           batch_size=32)
更详细的训练验证指南:https://tensorflow.google.cn/guide/keras/train_and_evaluate
ResNet Model(toy version)
 1 inputs = keras.Input(shape=(32, 32, 3), name=‘img‘)
 2 x = layers.Conv2D(32, 3, activation=‘relu‘)(inputs)
 3 x = layers.Conv2D(64, 3, activation=‘relu‘)(x)
 4 block_1_output = layers.MaxPooling2D(3)(x)
 5
 6 x = layers.Conv2D(64, 3, activation=‘relu‘, padding=‘same‘)(block_1_output)
 7 x = layers.Conv2D(64, 3, activation=‘relu‘, padding=‘same‘)(x)
 8 block_2_output = layers.add([x, block_1_output])
 9
10 x = layers.Conv2D(64, 3, activation=‘relu‘, padding=‘same‘)(block_2_output)
11 x = layers.Conv2D(64, 3, activation=‘relu‘, padding=‘same‘)(x)
12 block_3_output = layers.add([x, block_2_output])
13
14 x = layers.Conv2D(64, 3, activation=‘relu‘)(block_3_output)
15 x = layers.GlobalAveragePooling2D()(x)
16 x = layers.Dense(256, activation=‘relu‘)(x)
17 x = layers.Dropout(0.5)(x)
18 outputs = layers.Dense(10)(x)
19
20 model = keras.Model(inputs, outputs, name=‘toy_resnet‘)
21 model.summary()
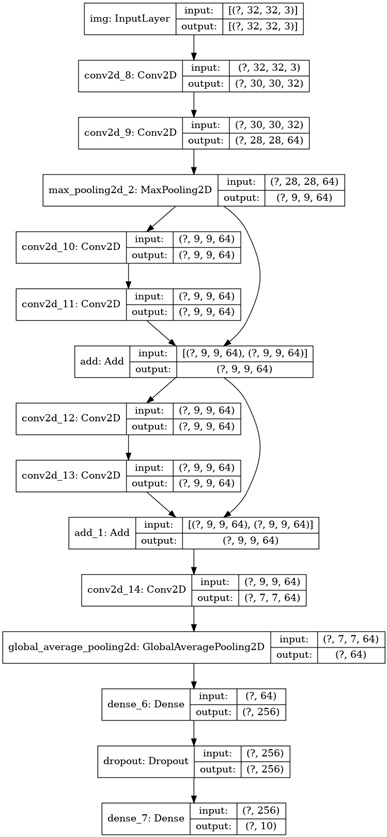
看一眼它的结构:
keras.utils.plot_model(model, ‘mini_resnet.png‘, show_shapes=True)

然后训练模型:
 1 (x_train, y_train), (x_test, y_test) = keras.datasets.cifar10.load_data()
 2
 3 x_train = x_train.astype(‘float32‘) / 255.
 4 x_test = x_test.astype(‘float32‘) / 255.
 5 y_train = keras.utils.to_categorical(y_train, 10)
 6 y_test = keras.utils.to_categorical(y_test, 10)
 7
 8 model.compile(optimizer=keras.optimizers.RMSprop(1e-3),
 9               loss=keras.losses.CategoricalCrossentropy(from_logits=True),
10               metrics=[‘acc‘])
11
12 model.fit(x_train, y_train,
13           batch_size=64,
14           epochs=1,
15           validation_split=0.2)
共享层
谈到共享层,便会想到Siamese Network系列的各种模型,包括图像分类,目标追踪,few shot目标检测等。了解这一类模型,便不难理解共享层在keras中的使用:
声明两个输入,将其输入到相同的层中,产生输出即可。
 1 # Embedding for 1000 unique words mapped to 128-dimensional vectors
 2 shared_embedding = layers.Embedding(1000, 128)
 3
 4 # Variable-length sequence of integers
 5 text_input_a = keras.Input(shape=(None,), dtype=‘int32‘)
 6
 7 # Variable-length sequence of integers
 8 text_input_b = keras.Input(shape=(None,), dtype=‘int32‘)
 9
10 # Reuse the same layer to encode both inputs
11 encoded_input_a = shared_embedding(text_input_a)
12 encoded_input_b = shared_embedding(text_input_b)
API的延伸:使用自定义层
tf.keras中包含广泛的层,例如:
- Convolutional layers: Conv1D, Conv2D, Conv3D, Conv2DTranspose
- Pooling layers: MaxPooling1D, MaxPooling2D, MaxPooling3D, AveragePooling1D
- RNN layers: GRU, LSTM, ConvLSTM2D
- BatchNormalization, Dropout, Embedding, etc.
但如果你找不到想要的层,便可以使用API的延伸,生成自己需要的层。自定义层需要继承layers.Layer类,并定义build 和call函数:
- call函数定义具体的前向计算过程;
- build函数初始化各层的权重;
 1 class CustomDense(layers.Layer):
 2   def __init__(self, units=32):
 3     super(CustomDense, self).__init__()
 4     self.units = units
 5
 6   def build(self, input_shape):
 7     self.w = self.add_weight(shape=(input_shape[-1], self.units),
 8                              initializer=‘random_normal‘,
 9                              trainable=True)
10     self.b = self.add_weight(shape=(self.units,),
11                              initializer=‘random_normal‘,
12                              trainable=True)
13
14   def call(self, inputs):
15     return tf.matmul(inputs, self.w) + self.b
16
17
18 inputs = keras.Input((4,))
19 outputs = CustomDense(10)(inputs)
20
21 model = keras.Model(inputs, outputs)
对于自定义层中的序列化支持,定义一个get_config方法,该方法返回层实例的构造函数参数:
 1 class CustomDense(layers.Layer):
 2
 3   def __init__(self, units=32):
 4     super(CustomDense, self).__init__()
 5     self.units = units
 6
 7   def build(self, input_shape):
 8     self.w = self.add_weight(shape=(input_shape[-1], self.units),
 9                              initializer=‘random_normal‘,
10                              trainable=True)
11     self.b = self.add_weight(shape=(self.units,),
12                              initializer=‘random_normal‘,
13                              trainable=True)
14
15   def call(self, inputs):
16     return tf.matmul(inputs, self.w) + self.b
17
18   def get_config(self):    # 新增函数,返回构造函数中的数值
19     return {‘units‘: self.units}
20
21
22 inputs = keras.Input((4,))
23 outputs = CustomDense(10)(inputs)
24
25 model = keras.Model(inputs, outputs)
26 config = model.get_config()   # 通过get_config来获取config信息
27
28 new_model = keras.Model.from_config(
29     config, custom_objects={‘CustomDense‘: CustomDense})
