40_系统审计 服务安全 Linux安全之打补丁
192.168.4.51
1.部署audit监控文件
使用audit监控/etc/ssh/sshd_config
当该文件发生任何变化即记录日志
通过手动和ausearch工具查看日志内容
1.1 配置audit审计系统
1)安装软件包,查看配置文件(确定审计日志的位置)
]# yum -y install audit //安装软件包
]# cat /etc/audit/auditd.conf //查看配置文件,确定日志位置
log_file = /var/log/audit/audit.log //日志文件路径
]# systemctl start auditd //启动服务
]# systemctl enable auditd //设置开机自启
2)配置审计规则
可以使用auditctl命令控制审计系统并设置规则决定哪些行为会被记录日志。
语法格式如下:
]# auditctl -s //查询状态
enabled 1
failure 1
pid 486
rate_limit 0
backlog_limit 8192
lost 0
backlog 0
loginuid_immutable 0 unlocked
]# auditctl -l //查看规则
No rules
]# auditctl -D //删除所有规则
定义临时文件系统规则:
#语法格式:auditctl -w path -p permission -k key_name
# path为需要审计的文件或目录
# 权限可以是r,w,x,a(文件或目录的属性发生变化)
# Key_name为可选项,方便识别哪些规则生成特定的日志项
]# auditctl -w /etc/passwd -p wa -k passwd_change
//设置规则所有对passwd文件的写、属性修改操作都会被记录审计日志
]# auditctl -w /etc/selinux/ -p wa -k selinux_change
//设置规则,监控/etc/selinux目录
]# auditctl -w /usr/sbin/fdisk -p x -k disk_partition
//设置规则,监控fdisk程序
]# auditctl -w /etc/ssh/sshd_conf -p warx -k sshd_config
//设置规则,监控sshd_conf文件
]# auditctl -l
-w /etc/passwd -p wa -k passwd_change
-w /etc/selinux -p wa -k selinux_change
-w /usr/sbin/fdisk -p x -k disk_partition
-w /etc/ssh/sshd_conf -p rwxa -k sshd_config
如果需要创建永久审计规则,则需要修改规则配置文件:
]# vim /etc/audit/rules.d/audit.rules
-w /etc/passwd -p wa -k passwd_changes
-w /usr/sbin/fdisk -p x -k partition_disks
1.2 步骤二:查看并分析日志
1)手动查看日志
查看SSH的主配置文件/etc/ssh/sshd_conf,查看audit日志信息:
]# tailf /var/log/audit/audit.log
type=SYSCALL msg=audit(1582679632.493:40): arch=c000003e
syscall=2 success=yes exit=3
a0=7fff71721839 a1=0 a2=1fffffffffff0000 a3=7fff717204c0
items=1 ppid=7654 pid=7808 auid=0 uid=0 gid=0 euid=0 suid=0
fsuid=0 egid=0 sgid=0 fsgid=0 tty=pts2 ses=3 comm="cat"
exe="/usr/bin/cat"
subj=unconfined_u:unconfined_r:unconfined_t:s0-s0:c0.c1023 key="sshd_config"
.. ..
#内容分析
# type为类型
# msg为(time_stamp:ID),时间是date +%s(1970-1-1至今的秒数)
# arch=c000003e,代表x86_64(16进制)
# success=yes/no,事件是否成功
# a0-a3是程序调用时前4个参数,16进制编码了
# ppid父进程ID,如bash,pid进程ID,如cat命令
# auid是审核用户的id,su - test, 依然可以追踪su前的账户
# uid,gid用户与组
# tty:从哪个终端执行的命令
# comm="cat" 用户在命令行执行的指令
# exe="/bin/cat" 实际程序的路径
# key="sshd_config" 管理员定义的策略关键字key
# type=CWD 用来记录当前工作目录
# cwd="/home/username"
# type=PATH
# ouid(owner‘s user id) 对象所有者id
# guid(owner‘s groupid) 对象所有者id
2)通过工具搜索日志
系统提供的ausearch命令可以方便的搜索特定日志,默认该程序会搜索/var/log/audit/audit.log,ausearch options -if file_name可以指定文件名。
]# ausearch -k sshd_config -i
//根据key搜索日志,-i选项表示以交互式方式操作
2.加固常见服务的安全
Nginx安全优化包括:删除不要的模块、修改版本信息、限制并发、拒绝非法请求、防止buffer溢出。
MySQL安全优化包括:初始化安全脚本、密码安全、备份与还原、数据安全。
Tomcat安全优化包括:隐藏版本信息、降权启动、删除默认测试页面.
2.1 优化Nginx服务的安全配置
1) 删除不需要的模块
Nignx是模块化设计的软件,需要什么功能与模块以及不需要哪些模块,都可以在编译安装软件时自定义,使用--with参数可以开启某些模块,使用--without可以禁用某些模块。最小化安装永远都是对的方案!
下面是禁用某些模块的案例:
]# tar -xf nginx-1.12.tar.gz
]# cd nginx-1.12
nginx-1.12]# ./configure \
>--without-http_autoindex_module \ //禁用自动索引文件目录模块
>--without-http_ssi_module
]# make && make install
]# ln -s /usr/local/nginx/sbin/nginx /sbin/
2) 修改版本信息,并隐藏具体的版本号
默认Nginx会显示版本信息以及具体的版本号,这些信息给攻击者带来了便利性,便于他们找到具体版本的漏洞。
如果需要屏蔽版本号信息,执行如下操作,可以隐藏版本号。
]# vim /usr/local/nginx/conf/nginx.conf
… …
http{
server_tokens off; //在http下面手动添加这么一行
… …
}
]# nginx -s reload
]# curl -I http://192.168.4.51 //查看服务器响应的头部信息
对比:
Server: nginx/1.12.2(修改前)
Server: nginx(修改后)
但服务器还是显示了使用的软件为nginx,通过如下方法可以修改该信息。
1.12]# vim +48 src/http/ngx_http_header_filter_module.c
//注意:vim这条命令必须在nginx-1.12源码包目录下执行!
//该文件修改前效果如下:
static u_char ngx_http_server_string[] = "Server: nginx" CRLF;
static u_char ngx_http_server_full_string[] = "Server: " NGINX_VER CRLF;
static u_char ngx_http_server_build_string[] = "Server: " NGINX_VER_BUILD CRLF;
//下面是我们修改后的效果:
static u_char ngx_http_server_string[] = "Server: Jacob" CRLF;
static u_char ngx_http_server_full_string[] = "Server: Jacob" CRLF;
static u_char ngx_http_server_build_string[] = "Server: Jacob" CRLF;
//修改完成后,再去编译安装Nignx,版本信息将不再显示为Nginx,而是Jacob
1.12]# ./configure
1.12]# make && make install
1.12]# killall nginx
1.12]# /usr/local/nginx/sbin/nginx //启动服务
1.12]# curl -I http://192.168.4.51 //查看版本信息验证
Server: Jacob
3) 限制并发量
DDOS攻击者会发送大量的并发连接,占用服务器资源(包括连接数、带宽等),这样会导致正常用户处于等待或无法访问服务器的状态。
Nginx提供了一个ngx_http_limit_req_module模块,可以有效降低DDOS攻击的风险,操作方法如下:
]# vim /usr/local/nginx/conf/nginx.conf
… …
http{
… …
limit_req_zone $binary_remote_addr zone=one:10m rate=1r/s;
server {
listen 80;
server_name localhost;
limit_req zone=one burst=5;
}
}
//备注说明:
//limit_req_zone语法格式如下:
//limit_req_zone key zone=name:size rate=rate;
//上面案例中是将客户端IP信息存储名称为one的共享内存,内存空间为10M
//1M可以存储8千个IP信息,10M可以存储8万个主机连接的状态,容量可以根据需要任意调整
//每秒中仅接受1个请求,多余的放入漏斗
//漏斗超过5个则报错
]# /usr/local/nginx/sbin/nginx -s reload
真机使用ab测试软件测试效果:
]# ab -c 10 -n 10 http://192.168.4.51/
...
Concurrency Level: 10
Time taken for tests: 5.002 seconds
Complete requests: 10
Failed requests: 4
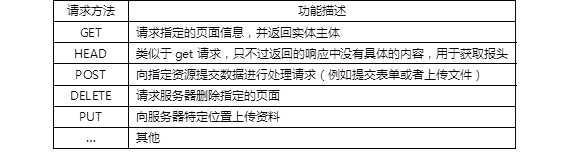
4) 拒绝非法的请求
网站使用的是HTTP协议,该协议中定义了很多方法,可以让用户连接服务器,获得需要的资源。但实际应用中一般仅需要get和post。
具体HTTP请求方法的含义如表-1所示。
表-1 HTTP请求方法及含义
未修改服务器配置前,真机使用不同请求方法测试:
]# curl -i -X GET http://192.168.4.51 //正常
]# curl -i -X HEAD http://192.168.4.51 //正常
//curl命令选项说明:
//-i选项:访问服务器页面时,显示HTTP的头部信息
//-X选项:指定请求服务器的方法
通过如下设置可以让Nginx拒绝非法的请求方法:
]# vim /usr/local/nginx/conf/nginx.conf
http{
server {
listen 80;
#这里,!符号表示对正则取反,~符号是正则匹配符号
#如果用户使用非GET或POST方法访问网站,则retrun返回444的错误信息
if ($request_method !~ ^(GET|POST)$ ) {
return 444;
...
]# /usr/local/nginx/sbin/nginx -s reload
修改服务器配置后,真机使用不同请求方法测试:
]# curl -i -X GET http://192.168.4.51 //正常
]# curl -i -X HEAD http://192.168.4.51 //报错
curl: (52) Empty reply from server
4) 防止buffer溢出
当客户端连接服务器时,服务器会启用各种缓存,用来存放连接的状态信息。
如果攻击者发送大量的连接请求,而服务器不对缓存做限制的话,内存数据就有可能溢出(空间不足)。
修改Nginx配置文件,调整各种buffer参数,可以有效降低溢出风险。
]# vim /usr/local/nginx/conf/nginx.conf
http{
client_body_buffer_size 1K; 客户端缓冲区的大小
client_header_buffer_size 1k; 协议头部信息的大小
client_max_body_size 1k; 网页页面内容的大小
large_client_header_buffers 2 1k; 客户端头部信息的大小
… …
}
]# /usr/local/nginx/sbin/nginx -s reload
2.2 数据库安全
1) 初始化安全脚本
安装完MariaDB或MySQL后,默认root没有密码,并且提供了一个任何人都可以操作的test测试数据库。有一个名称为mysql_secure_installation的脚本,该脚本可以帮助我们为root设置密码,并禁止root从远程其他主机登陆数据库,并删除测试性数据库test。
]# yum -y install mariadb mariadb-server mariadb-devel
]# systemctl status mariadb
//确保服务已启动
]# mysql_secure_installation
//执行初始化安全脚本,用自带脚本初始化安全配置
修改密码--删除匿名账户--禁止root远程登陆--删除测试数据库--刷新权限
2)密码安全
手动修改MariaDB或MySQL数据库密码的方法:
]# mysqladmin -uroot -predhat password ‘mysql‘
//修改密码,旧密码为redhat,新密码为mysql
]# mysql -uroot -pmysql
MariaDB [(none)]>set password for root@‘localhost‘=password(‘redhat‘);
//使用账户登录数据库,修改密码
MariaDB [mysql]> select user,host,password from mysql.user where user=‘root‘;
+------+-----------+-------------------------------------------+
| user | host | password |
+------+-----------+-------------------------------------------+
| root | localhost | *84BB5DF4823DA319BBF86C99624479A198E6EEE9 |
| root | node | |
| root | 127.0.0.1 | |
| root | ::1 | |
+------+-----------+-------------------------------------------+
修改密码成功,而且密码在数据库中是加密的,有什么问题吗?问题是你的密码被明文记录了,下面来看看明文密码:
]# cat .bash_history
mysqladmin -uroot -pxxx password ‘redhat‘
//通过命令行修改的密码,bash会自动记录历史,历史记录中记录了明文密码
]# cat .mysql_history
set password for root@‘localhost‘=password(‘redhat‘);
select user,host,password from mysql.user;
flush privileges;
//通过mysql命令修改的密码,mysql也会有所有操作指令的记录,这里也记录了明文密码
另外数据库还有一个binlog日志里也有明文密码(5.6版本后修复了)。
怎么解决?
管理好自己的历史,不使用明文登录,选择合适的版本5.6以后的版本,
日志,行为审计(找到行为人),使用防火墙从TCP层设置ACL(禁止外网接触数据库)。
3)数据备份与还原
首先,备份数据库(注意用户名为root,密码为redhat):
//备份数据库中的某个数据表
> SELECT * FROM t1;
+------+----------+
| id | name |
+------+----------+
| 1 | zhangsan |
| 2 | lisi |
+------+----------+
]# mysqldump -uroot -predhat mydb t1 > t1.sql
> DELETE FROM t1;
恢复数据
]# mysql -uroot -p123456 mydb < t1.sql
> SELECT * FROM t1;已恢复
//备份某个数据库
]# mysqldump -uroot -predhat mydb > mydb.sql
//备份所有数据库
]# mysqldump -uroot -predhat --all-databases > all.sql
接下来,还原数据库(注意用户名为root,密码为redhat):
]# mysql -uroot -predhat mydb < table.sql //还原数据表
]# mysql -uroot -predhat mydb < mydb.sql //还原数据库
]# mysql -uroot -predhat < all.sql //还原所有数据库
4)数据安全
在服务器上(192.168.4.51),创建一个数据库账户:
]# mysql -uroot -predhat
//使用管理员,登陆数据库
MariaDB [(none)]> grant all on *.* to tom@‘%‘ identified by ‘123‘;
//创建一个新账户tom
使用tcpdump抓包(192.168.4.51)
]# tcpdump -w log -i any src or dst port 3306
//抓取源或目标端口是3306的数据包,保存到log文件中
真机从远程登陆数据库服务器(192.168.4.51)
]# mysql -utom -p123 -h 192.168.4.51
> select * from mysql.user;
//登陆数据库后,任意执行一条查询语句
回到服务器查看抓取的数据包
]# tcpdump -A -r log
//使用tcpdump查看之前抓取的数据包,很多数据库的数据都明文显示出来
如何解决?
可以使用SSH远程连接服务器后,再从本地登陆数据库(避免在网络中传输数据,因为网络环境中不知道有没有抓包者)。
或者也可以使用SSL对MySQL服务器进行加密,类似与HTTP+SSL一样,MySQL也支持SSL加密(确保网络中传输的数据是被加密的)。
2.3 Tomcat安全性
服务端:192.168.4.53(检测) 客户端:192.168.4.54(提供页面)
1) 隐藏版本信息、修改tomcat主配置文件(隐藏版本信息)
未修改版本信息前,使用命令查看服务器的版本信息
服务端:
搭建好Tomcat服务器
]# netstat -nutlp | grep java
tcp6 0 0 :::8080 :::* LISTEN 11966/java
tcp6 0 0 127.0.0.1:8005 :::* LISTEN 11966/java
tcp6 0 0 :::8009 :::* LISTEN 11966/java
//访问不存在的页面文件,查看头部信息
]# curl -I http://192.168.4.54:8080/xx
HTTP/1.1 404 Not Found
Server: Apache-Coyote/1.1
Content-Type: text/html;charset=utf-8
Content-Language: en
Content-Length: 998
Date: Wed, 20 Feb 2019 05:59:04 GMT
//访问存在的页面文件,查看头部信息
]# curl -I http://192.168.4.54:8080
HTTP/1.1 200 OK
Server: Apache-Coyote/1.1
Content-Type: text/html;charset=UTF-8
Transfer-Encoding: chunked
Date: Wed, 20 Feb 2019 06:00:06 GMT
//访问不存在的页面文件,查看错误信息
]# curl http://192.168.4.54:8080/xx
...<title>Apache Tomcat/8.0.30 - Error report...
修改tomcat配置文件,修改版本信息(在192.168.4.54操作):
]# yum -y install java-1.8.0-openjdk-devel
]# cd /usr/local/tomcat/lib/
lib]# jar -xf catalina.jar
//根据自己的需要,修改版本信息的内容
lib]# vim org/apache/catalina/util/ServerInfo.properties
...Zhang Kai/8.0.30...
lib]# /usr/local/tomcat/bin/shutdown.sh
lib]# /usr/local/tomcat/bin/startup.sh
修改后,客户端再次查看版本信息(在192.168.4.53操作):
//访问不存在的页面文件,查看头部信息
]# curl -I http://192.168.4.54:8080/xx
HTTP/1.1 404 Not Found
Server: Apache-Coyote/1.1
Content-Type: text/html;charset=utf-8
Content-Language: en
Content-Length: 990
Date: Wed, 20 Feb 2019 06:06:18 GMT
//访问存在的页面文件,查看头部信息
]# curl -I http://192.168.4.54:8080
HTTP/1.1 200 OK
Server: Apache-Coyote/1.1
Content-Type: text/html;charset=UTF-8
Transfer-Encoding: chunked
Date: Wed, 20 Feb 2019 06:07:41 GMT
//访问不存在的页面文件,查看错误信息
]# curl http://192.168.4.54:8080/xx
...
<title>Zhang Kai/8.0.30 - Error report</title>
...
再次修改tomcat服务器配置文件,修改版本信息,手动添加server参数(在192.168.4.54操作):
lib]# vim /usr/local/tomcat/conf/server.xml(69行)
<Connector port="8080" protocol="HTTP/1.1"
connectionTimeout="20000" redirectPort="8443" server="ZhangKai" />
lib]# /usr/local/tomcat/bin/shutdown.sh
lib]# /usr/local/tomcat/bin/startup.sh
修改后,客户端再次查看版本信息(在192.168.4.53操作):
//访问不存在的页面文件,查看头部信息
]# curl -I http://192.168.4.54:8080/xx
HTTP/1.1 404 Not Found
Content-Type: text/html;charset=utf-8
Content-Language: en
Content-Length: 990
Date: Wed, 20 Feb 2019 06:17:23 GMT
Server: ZhangKai
//访问存在的页面文件,查看头部信息
]# curl -I http://192.168.4.54:8080
HTTP/1.1 200 OK
Content-Type: text/html;charset=UTF-8
Transfer-Encoding: chunked
Date: Wed, 20 Feb 2019 06:18:24 GMT
Server: ZhangKai
//访问不存在的页面文件,查看错误信息
]# curl http://192.168.4.54:8080/xx
...<title>Zhang Kai/8.0.30 - Error report...
2)降级启动(4.54)
默认tomcat使用系统高级管理员账户root启动服务,启动服务尽量使用普通用户。
//修改tomcat目录的权限,让tomcat账户对该目录有操作权限
]# useradd tomcat
]# chown -R tomcat:tomcat /usr/local/tomcat/
//使用su命令切换为tomcat账户,以tomcat账户的身份启动tomcat服务
]# su -c /usr/local/tomcat/bin/startup.sh tomcat
]# chmod +x /etc/rc.local //该文件为开机启动文件
]# vim /etc/rc.local //修改文件,添加如下内容
su -c /usr/local/tomcat/bin/startup.sh tomcat
3)删除默认的测试页面
]# rm -rf /usr/local/tomcat/webapps/*
3.使用diff和patch工具打补丁
使用diff对比文件差异
使用diff生成补丁文件
使用patch命令为旧版本打补丁
程序是人设计出来的,总是会有这样那样的问题与漏洞,目前的主流解决方法就是为有问题的程序打补丁,升级新版本。
在Linux系统中diff命令可以为我们生成补丁文件,然后使用patch命令为有问题的程序代码打补丁。
3.1 对比单个文件差异
1) 编写两个版本的脚本,一个为v1版本,一个为v2版本。
]# cat test1.sh //v1版本脚本
#!/bin/bash
echo "hello wrld"
]# cat test2.sh //v2版本脚本
#!/bin/bash
echo "hello the world"
echo "test file"
2) 使用diff命令语法
使用diff命令查看不同版本文件的差异。
]# diff test1.sh test2.sh //查看文件差异
2c2,3
< echo "hello wrld"
---
> echo "hello the world"
> echo "test file"
]# diff -u test1.sh test2.sh //查看差异,包含头部信息
--- test1.sh 2020-02-26 09:54:09.343789312 +0800
+++ test2.sh 2020-02-26 09:54:24.321585763 +0800
@@ -1,2 +1,3 @@
#!/bin/bash
-echo "hello wrld"
+echo "hello the world"
+echo "test file"
diff制作补丁文件的原理:告诉我们怎么修改第一个文件后能得到第二个文件。
这样如果第一个版本的脚本有漏洞,我们不需要将整个脚本都替换,仅需要修改有问题的一小部分代码即可,diff刚好可以满足这个需求!
像Linux内核这样的大块头,一旦发现有一个小漏洞,我们不可能把整个内核都重新下载,全部替换一遍,而仅需要更新有问题的那一小部分代码即可!
diff命令常用选项:
-u输出统一内容的头部信息(打补丁使用),计算机知道是哪个文件需要修改
-r递归对比目录中的所有资源(可以对比目录)
-a所有文件视为文本(包括二进制程序)
-N无文件视为空文件(空文件怎么变成第二个文件)
-N选项备注说明:
A目录下没有txt文件,B目录下有txt文件
diff比较两个目录时,默认会提示txt仅在B目录有(无法对比差异,修复文件)
diff比较时使用N选项,则diff会拿B下的txt与A下的空文件对比,补丁信息会明确说明如何从空文件修改后变成txt文件,打补丁即可成功!
3.2 使用patch命令对单文件代码打补丁
1)准备
]# mkdir demo
]# cd demo
demo]# vim test1.sh
#!/bin/bash
echo "hello world"
echo "test"
demo]# vim test2.sh
#!/bin/bash
echo "hello the world"
echo "test file"
2) 生成补丁文件
demo]# diff -u test1.sh test2.sh > test.patch
]# cat test.patch
--- test1.sh 2020-02-26 09:57:46.199736966 +0800
+++ test2.sh 2020-02-26 09:58:14.416296317 +0800
@@ -1,3 +1,3 @@
#!/bin/bash
-echo "hello world"
-echo "test"
+echo "hello the world"
+echo "test file"
3)使用patch命令打补丁
在代码相同目录下为代码打补丁
demo]# yum -y install patch
demo]# patch -p0 < test.patch //打补丁
patching file test1.sh
demo]# cat test1.sh //查看更新
#!/bin/bash
echo "hello the world"
echo "test file"
//patch -pnum(其中num为数字,指定删除补丁文件中多少层路径前缀)
//如原始路径为/u/howard/src/blurfl/blurfl.c
//-p0则整个路径不变
//-p1则修改路径为u/howard/src/blurfl/blurfl.c
//-p4则修改路径为blurfl/blurfl.c
//-R(reverse)反向修复,-E修复后如果文件为空,则删除该文件
demo]# patch -RE < test.patch //还原旧版本,反向修复
demo]# cat test1.sh
#!/bin/bash
echo "hello world"
echo "test"
3.3 对比目录中所有文件的差异
1) 准备实验环境
]# mkdir demo
]# cd demo
demo]# mkdir {source1,source2}
demo]# echo "hello world" > source1/test.sh
demo]# cp /bin/find source1/
demo]# tree source1/ //source1目录下2个文件
source1/
├── find
└── test.sh
demo]# echo "hello the world" > source2/test.sh
demo]# echo "test" > source2/tmp.txt
demo]# cp /bin/find source2/
demo]# echo "1" >> source2/find
demo]# tree source2/ //source2目录下3个文件
source2/
├── find
├── test.sh
└── tmp.txt
//注意:两个目录下find和test.sh文件内容不同,source2有tmp.txt而source1没有该文件
2)制作补丁文件
demo]# diff -u source1/ source2/
Binary files source1/find and source2/find differ
diff -u source1/test.sh source2/test.sh
--- source1/test.sh 2020-02-26 10:02:26.607357935 +0800
+++ source2/test.sh 2020-02-26 10:03:47.217104646 +0800
@@ -1 +1 @@
-hello world
+hello the world
只在 source2/ 存在:tmp.txt
//仅对比了文本文件test.sh;二进制文件、tmp都没有对比差异,仅提示,因为没有-a和-N选项
demo]# diff -Nu source1/ source2/
Binary files source1/find and source2/find differ
diff -Nu source1/test.sh source2/test.sh
--- source1/test.sh 2020-02-26 10:02:26.607357935 +0800
+++ source2/test.sh 2020-02-26 10:03:47.217104646 +0800
@@ -1 +1 @@
-hello world
+hello the world
diff -Nu source1/tmp.txt source2/tmp.txt
--- source1/tmp.txt 1970-01-01 08:00:00.000000000 +0800
+++ source2/tmp.txt 2020-02-26 10:03:52.691023077 +0800
@@ -0,0 +1 @@
+test
//对比了test.sh,并且使用source2目录的tmp.txt与source1的空文件对比差异。
]# diff -Nua source1/ source2/
//对比了test.sh、tmp.txt、find(程序)
3.4 使用patch命令对目录下的所有代码打补丁
1)使用前面创建的source1和source2目录下的代码为素材,生成补丁文件
demo]# diff -Nuar source1/ source2/ > source.patch
2)使用patch命令为代码打补丁
demo]# ls
source1 source2 source.patch
demo]# cat source.patch //对比的文件有路径信息
...
diff -Nuar source1/test.sh source2/test.sh
--- source1/test.sh 2020-02-26 10:02:26.607357935 +0800
+++ source2/test.sh 2020-02-26 10:03:47.217104646 +0800
@@ -1 +1 @@
-hello world
+hello the world
diff -Nuar source1/tmp.txt source2/tmp.txt
--- source1/tmp.txt 1970-01-01 08:00:00.000000000 +0800
+++ source2/tmp.txt 2020-02-26 10:03:52.691023077 +0800
@@ -0,0 +1 @@
+test
demo]# cd source1
source1]# patch -p1 < ../source.patch
patching file find
patching file test.sh
patching file tmp.txt
]# ls
find test.sh tmp.txt
]# cat test.sh
hello the world