Cisco ASA “URL过滤”及“日志管理”
实施URL过滤一般分成以下三个步骤:
1、创建class-map(类映射),识别传输流量。
2、创建policy-map(策略映射),关联class-map。
3、应用policy-map到接口上。
(个人感觉这玩意用到的地方很少,大部分都是使用第三方软件,一键管理)
配置步骤如下:
(1)、创建class-map,识别传输流量:
asa(config)# access-list tcp_filter1 permit tcp 192.168.1.0 255.255.255.0 any eq www
asa(config)# class-map tcp_filter_class1
asa(config-cmap)# match access-list tcp_filter1 在class-map中定义允许的流量。
asa(config-cmap)# exit
asa(config)# regex url1 ".kkgame.com" 定义名称为urll的正则表达式,
表示URL扩展名是“.kkgame.com”
asa(config)# class-map type regex match-any url_class1 创建名称为
url_class1的clas-map,类型为regex。关键字match-any表示匹配任何一个。
asa(config-cmap)# match regex url1
asa(config)# class-map type inspect http http_url_class1 创建
名为http-url-class1的class-map,类型为inspect http(检查http流量)
asa(config-cmap)# match request header host regex class url_class1 匹配http请求
报文头中的host域中的URL扩展名“.kkgame.com”,url_class1表示调用名称为url_class1的class-map。
asa(config-cmap)# exit
(2)、创建policy-map,关联class-map。
asa(config)# policy-map type inspect http http_url_policy1
创建名称为 http_url_policy1的policy-map,类型为inspect http(检查http流量)
asa(config-pmap)# class http_url_class1 调用之前创建的class-map
asa(config-pmap-c)# drop-connection log drop数据包并关闭连接,并发送系统日志。
asa(config-pmap-c)# exit
asa(config-pmap)# exit
asa(config)# policy-map inside_http_url_policy 创建名称为 inside_http_url_policy 的policy-map,
它将被应用到接口上。
asa(config-pmap)# class tcp_filter_class1 调用之前创建的class-map
asa(config-pmap-c)# inspect http http_url_policy1 检查http流量
asa(config-pmap-c)# exit
asa(config-pmap)# exit
(3)、应用policy-map到接口上:
asa(config)# service-policy inside_http_url_policy interface inside
需要注意的是,一个接口只能应用一个policy-map。
日志管理:
对于任何防火墙产品来说,最重要的功能之一就是对时间进行日志记录,ASA使用同步日志来记录在防火墙上发生的所有时间。
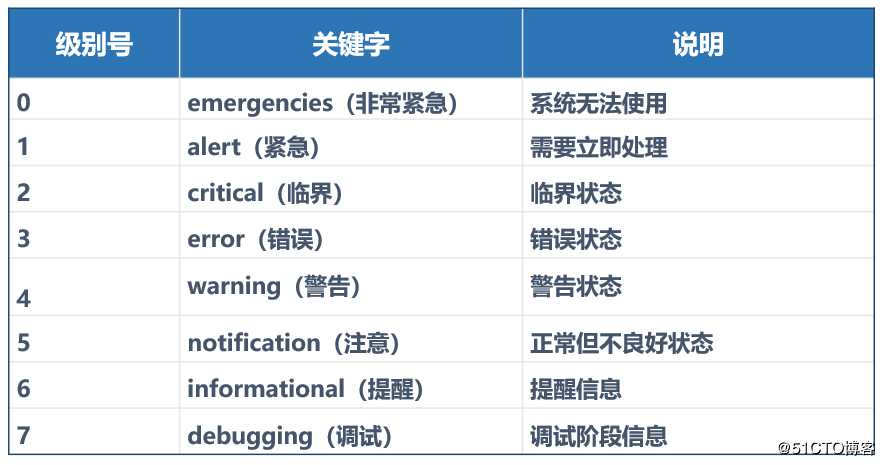
如图上所示,日志信息的安全级别可分为8个等级。
配置日志:
日志信息可以输出到log buffer(日志缓冲区)、ASDM和日志服务器。
在配置日志前,一般需要先配置时区和时间,然后分别配置log buffer、ASDM和日志服务器,具体如下:
asa(config)# clock timezone beijing 8 beijing用来指定所在时区的名称,
8是指相对于国际标准时间的偏移量,这个值的取值范围为-23~+23
asa(config)# clock set 13:12:00 30 april 2019 配置时间,
顺序依次为:小时、分钟、秒、日、月、年。
配置log buffer,命令如下:
asa(config)# logging enable
asa(config)# logging buffered informational 配置informational级别的日志
log buffer的默认大小是4KB。
查看log buffer的命令如下:
asa(config)# show logging
清除log buffer的命令如下:
asa(config)# clear logging buffer
配置ASDM日志,命令如下:
asa(config)# logging enable
asa(config)# logging asdm informational
清除ASDM log buffer的命令如下:
asa(config)# clear logging asdm
配置日志服务器:
目前有很多日志服务器软件,推荐使用基于web的防火墙日志分析软件:firewall analyzer 6,它支持Windows和Linux平台。
asa(config)# logging enable
asa(config)# logging timestamp
asa(config)# logging trap informational
asa(config)# logging host inside 192.168.1.1