微信小程序案例TODO备忘录
微信小程序案例TODO备忘录
本节展示一个制作todo备忘录的案例讲解
代码:https://github.com/Harryjun/WeChatPrj/tree/master/TODOPrj

1.1 页面布局
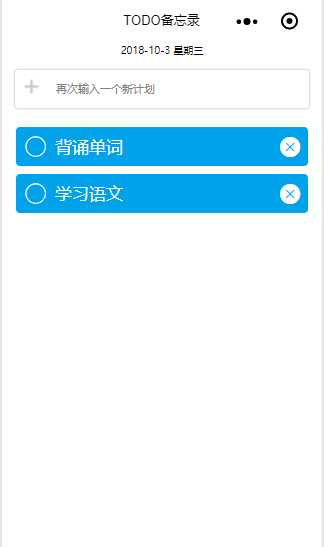
页面布局也就是wxml文件,我们给上述界面做一个划分,大致分为三个部分,第一部分为最上方日期显示;第二部分为第二栏的输入框,第三部分为下面的信息框。
在整体上我们用一个大的view,定义为类container
<view class = "container">


</view>
container我们定义其类属性为
.container{
  background-color: white;
  width: 100%;
  height: 100%;
  display: flex;
  flex-direction: column;
}
背景色设置为白色,宽度100%,弹性布局,竖直排列子项。column代表垂直。
1.1.1 第一层
在第一层我们用一个view框住一个text,里面显示today日期,利用数据绑定绑定主js中的数据(双大括号代表数据绑定的意思,也就是里面是变量名,他会同步js中的数据,例如这里绑定today,则我们再js代码中可以改变today的值,这里会不断更新数据。)
<view class = "container">
  <view class = "today">
    <text>{{Today}}</text>
  </view>
</view>
对应的wxss代码如下:
.today{
  font-size: 10px;
}
将其字体设置好即可
1.1.2 第二层
第二层我们用一个view包含两个控件,
一个是image,image需要绑定图片源。
另一个是input输入框,输入框需要绑定两个函数1)输入信息触发bindinput=‘AddInput‘此时输入一个字符,我们应该更新以下输入框的内容2)确定触发函数bindconfirm=‘AddConfirm‘此函数应该触发保存信息,并创建一个新的备忘。输入框的value我们数据绑定到js中的input数据。placeholder代表数据为空时显示的字符,也就是提示。
 <view class = "additem">
    <view class = "add">
      <image class = ‘plus‘ src = ‘../../images/plus.png‘ />
      <input value = "{{input}}" auto-focus  class = "InputAdd" placeholder=‘再次输入一个新计划‘ bindinput=‘AddInput‘ bindconfirm=‘AddConfirm‘/>
    </view>
  </view>
对应的wxss代码:
.additem{
  width: 100%;
}
.add{
  display: flex;
  flex-direction: row;
  border: 1rpx solid #e0e0e0;
  border-radius: 10rpx;
  box-shadow: 0 0 5rpx #e0e0e0;
  margin-bottom: 30rpx;
  margin-left: 30rpx;
  margin-right: 30rpx;
  margin-top: 30rpx;
  padding: 20rpx;
}
.plus{
  width: 41rpx;
  height: 41rpx;
  padding-right: 20rpx;
}
.InputAdd{
  padding-left: 20rpx;
  font-size: 28rpx;

}
1.1.3 第三层
第三层我们用一个view包括所有的信息,然后再用循环把所有的信息遍历,每一条信息横排,包括复选框(代表是否完成)、信息(反应备忘的内容)、删除图标(删除信息内容)
1)其中我们再wx:for中需要回馈id我们让id等于index的值,这样在点击事件函数中就能获取到id信息就知道时数组的第几条信息了。,然后为他绑定点击函数toggleTodoHandle,如果点击某一条信息我们就让其变为完成状态。;
2)复选框的类型 type属性我们用了一个问号表达式item.completed ? ‘success‘ : ‘circle‘代表如果?前面的表达式为true则其值为冒号前的表达式或者字符如果未false则未冒号后面的字符。所以此处的意思时如果已经完成我们就将icon类型设置为成功,如果未完成则设置未圆圈。
<view class = "todo-today1">
    <view class = "todo-today">
      <view class = "today-item" wx:for = "{{TodayList}}" wx:key="{{ index }}" bindtap="toggleTodoHandle" id = "{{index}}"   >
        <icon class = "itemcheckbox"   type = "{{item.completed ? ‘success‘ : ‘circle‘}}"   color="white"/>
        <text class = "{{item.completed ? ‘itemdescriptiontcompleted‘:‘itemdescriptiont‘}}" >{{item.description}}</text>
        <icon class = ‘itemremove‘ type = ‘clear‘ size = ‘20‘ color = "white" bindtap="removeTodoHandle" id = ‘{{index}}‘ />
     </view>
   </view>
 </view>
其wxss代码如下:
.todo-today{
  font-size: 15px;
  padding-left: 20rpx;
  padding-right: 20rpx;
  margin-left: 20rpx;
  margin-right: 20rpx;
  vertical-align: center;
  margin: 2px;
}
.todo-today1{
  width: 100%;
}
.today-item{
  display: flex;
  flex-direction: row;
  padding: 20rpx;
  background-color: #00a2ea;
  border: 10rpx solid white;
  border-radius: 20rpx;
}
.itemdescriptiont{
  flex: 1;
  font-size: 40rpx;
  color: white;
}
.itemdescriptiontcompleted{
  flex: 1;
  text-decoration: line-through;
  font-size: 40rpx;
  color: white;
}
.itemremove{
  cursor: pointer;
  padding-top: 7rpx;
}
.itemcheckbox{
  margin-right: 20rpx;
}
1.2 JAVAScript代码端
此部分代码主要设计几个函数
1、onLoad函数(初始化数据)2、删除数据3、增添数据4、输入框输入数据触发
5、保存数据到本地 6、调取本地数据
1.2.1 数据
在page-data中定义了全局数据
总共三个数据 :备忘录列表、日期、输入框信息
Page({

  /**
   * 页面的初始数据
   */
  data: {
    TodayList:[],
    Today:"",
    input:""
  },
})
1.2.2数据保存到本地与获取本地数据
  /**
   * 存储列表数据函数
   */
  save:function(){
    wx.setStorageSync(‘TodayList‘, this.data.TodayList);
  },

  loadData:function(){
    var todo = wx.getStorageSync(‘TodayList‘);
    if(todo){
      this.setData({
        TodayList: todo
      });
    }

  },
1.2.3 数据增加
利用数组的push函数。
/**
   * 增加一条记录
   */
  AddConfirm:function(e){
    var that = this;
    var todo = this.data.TodayList;
    todo.push({description:this.data.input,completed:false})
    //更新数据
    that.setData({TodayList:todo,input:‘‘});
    //输出日志信息
    console.log(this.data.TodayList)
    //保存记录到本地
    this.save();
  },
1.2.4 删除数据
利用数组的splice方法。
/**
   * 清除一条记录
   */
  removeTodoHandle:function(e){
    var todo = this.data.TodayList;
    var index = e.currentTarget.id;
    //删除数据
    todo.splice(index,1);
    console.log(todo);
    //设置数据
    this.setData({
      TodayList:todo
    });
    this.save();
  },
1.2.5 更改任务状态
  /**
   * 更改任务状态
   * */
  toggleTodoHandle: function (e) {
    var todo = this.data.TodayList;
    //获取e传输的id
    var index = e.currentTarget.id;
    //改变complete状态
    todo[index].completed = !todo[index].completed;
    //更改数据
    this.setData({
      TodayList:todo
    });
    this.save();
  },
1.2.6 生命周期函数
此函数主要用来更新时间,可以看一下date类型
然后获取本地数据。
  /**
   * 生命周期函数--监听页面加载
   */
  onLoad: function (options) {
    //计算日期
    var that = this;
    var date1 = new Date;
    var date2 = new Array("星期日","星期一", "星期二", "星期三", "星期四", "星期五", "星期六");
    var Today;
    Today = date1.getFullYear() + ‘-‘ + (date1.getMonth() + 1) + ‘-‘ + date1.getDate() + ‘   ‘ + (date2[date1.getDay()]);
    var TodayStorage = wx.getStorageSync("Today");
    if (TodayStorage != Today){
      wx.setStorageSync("Today", Today);
    }
    that.setData({
      Today:Today
    });

    //获取本地存储日志
    this.loadData();


  },
js代码相对简单。
