Python——决策树实战:california房价预测
Python——决策树实战:california房价预测
编译环境:Anaconda、Jupyter Notebook
首先,导入模块:
1 import pandas as pd
2 import matplotlib.pyplot as plt
3 %matplotlib inline
接下来导入数据集:
1 from sklearn.datasets.california_housing import fetch_california_housing
2 housing = fetch_california_housing()
3 print(housing.DESCR)  #description
使用sklearn自带的数据集california_housing,详情见:Python——sklearn提供的自带的数据集
运行结果:
California housing dataset.

The original database is available from StatLib

    http://lib.stat.cmu.edu/datasets/

The data contains 20,640 observations on 9 variables.

This dataset contains the average house value as target variable
and the following input variables (features): average income,
housing average age, average rooms, average bedrooms, population,
average occupation, latitude, and longitude in that order.

References
----------

Pace, R. Kelley and Ronald Barry, Sparse Spatial Autoregressions,
Statistics and Probability Letters, 33 (1997) 291-297.
查看一下数据:
1 housing.data.shape
(20640, 8)
1 housing.data[0]
array([   8.3252    ,   41.        ,    6.98412698,    1.02380952,
        322.        ,    2.55555556,   37.88      , -122.23      ])
树模型参数:
-
1.criterion gini or entropy
-
2.splitter best or random 前者是在所有特征中找最好的切分点 后者是在部分特征中(数据量大的时候)
-
3.max_features None(所有),log2,sqrt,N 特征小于50的时候一般使用所有的
-
4.max_depth 数据少或者特征少的时候可以不管这个值,如果模型样本量多,特征也多的情况下,可以尝试限制下
-
5.min_samples_split 如果某节点的样本数少于min_samples_split,则不会继续再尝试选择最优特征来进行划分如果样本量不大,不需要管这个值。如果样本量数量级非常大,则推荐增大这个值。
-
6.min_samples_leaf 这个值限制了叶子节点最少的样本数,如果某叶子节点数目小于样本数,则会和兄弟节点一起被剪枝,如果样本量不大,不需要管这个值,大些如10W可是尝试下5
-
7.min_weight_fraction_leaf 这个值限制了叶子节点所有样本权重和的最小值,如果小于这个值,则会和兄弟节点一起被剪枝默认是0,就是不考虑权重问题。一般来说,如果我们有较多样本有缺失值,或者分类树样本的分布类别偏差很大,就会引入样本权重,这时我们就要注意这个值了。
-
8.max_leaf_nodes 通过限制最大叶子节点数,可以防止过拟合,默认是"None”,即不限制最大的叶子节点数。如果加了限制,算法会建立在最大叶子节点数内最优的决策树。如果特征不多,可以不考虑这个值,但是如果特征分成多的话,可以加以限制具体的值可以通过交叉验证得到。
-
9.class_weight 指定样本各类别的的权重,主要是为了防止训练集某些类别的样本过多导致训练的决策树过于偏向这些类别。这里可以自己指定各个样本的权重如果使用“balanced”,则算法会自己计算权重,样本量少的类别所对应的样本权重会高。
-
10.min_impurity_split 这个值限制了决策树的增长,如果某节点的不纯度(基尼系数,信息增益,均方差,绝对差)小于这个阈值则该节点不再生成子节点。即为叶子节点 。
- n_estimators:要建立树的个数
接下来首先把算法实例化出来,然后传参进行训练。
1 from sklearn import tree
2 dtr = tree.DecisionTreeRegressor(max_depth = 2)
3 # 使用两列的特征进行训练 即传两个参数x, y
4 dtr.fit(housing.data[:, [6, 7]], housing.target)
输出:
DecisionTreeRegressor(criterion=‘mse‘, max_depth=2, max_features=None,
           max_leaf_nodes=None, min_impurity_split=1e-07,
           min_samples_leaf=1, min_samples_split=2,
           min_weight_fraction_leaf=0.0, presort=False, random_state=None,
           splitter=‘best‘)
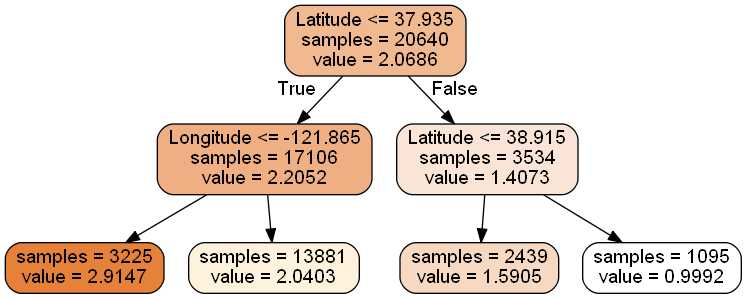
为了将决策树可视化,首先安装graphviz。export_graphviz出口也支持多种美学选项,包括可以通过类着色节点(或值回归)和如果需要的话使用显式的变量和类名称。IPython笔记本还可以使用Image()函数内联渲染这些图:
 1 #要可视化显示 首先需要安装 graphviz   http://www.graphviz.org/Download..php
 2 dot_data =  3     tree.export_graphviz(
 4         dtr,
 5         out_file = None,
 6         feature_names = housing.feature_names[6:8],
 7         filled = True,
 8         impurity = False,
 9         rounded = True
10     )
graphviz及pydotplus安装步骤 :Python——graphviz及pydotplus安装步骤
安装了Python模块pydotplus后,可以直接在Python中生成PNG文件(或任何其他支持的文件类型):
1 #pip install pydotplus
2 import pydotplus
3 graph = pydotplus.graph_from_dot_data(dot_data)
4 graph.get_nodes()[7].set_fillcolor("#FFF2DD")
5 graph.write_png("graph.png")
6 from IPython.display import Image
7 Image(graph.create_png())
将数据集进行划分,划分为训练集和测试集,并进行训练、验证
1 from sklearn.model_selection import train_test_split
2 x_train, x_test, y_train, y_test = 3     train_test_split(housing.data, housing.target, test_size = 0.1, random_state = 42)
4 dtr = tree.DecisionTreeRegressor(random_state=42)
5 dtr.fit(x_train, y_train)
6
7 dtr.score(x_test, y_test)
结果:
0.637318351331017
使用随机森林:
1 from sklearn.ensemble import RandomForestRegressor
2 rfr = RandomForestRegressor( random_state = 42)
3 rfr.fit(x_train, y_train)
4 rfr.score(x_test, y_test)
结果:
0.79086492280964926
用交叉验证选取参数:
1 from sklearn.grid_search import GridSearchCV
2
3 # 一般把参数写成字典的格式:
4 tree_param_grid = { ‘min_samples_split‘: list((3, 6, 9)),‘n_estimators‘: list((10,50,100))}
5
6 # 第一个参数是模型,第二个参数是待选的参数,cv:进行几次交叉验证
7 grid = GridSearchCV(RandomForestRegressor(), param_grid = tree_param_grid, cv = 5)
8 grid.fit(x_train, y_train)
9 grid.grid_scores_, grid.best_params_, grid.best_score_
结果为:
([mean: 0.78795, std: 0.00337, params: {‘min_samples_split‘: 3, ‘n_estimators‘: 10},
  mean: 0.80463, std: 0.00308, params: {‘min_samples_split‘: 3, ‘n_estimators‘: 50},
  mean: 0.80732, std: 0.00448, params: {‘min_samples_split‘: 3, ‘n_estimators‘: 100},
  mean: 0.78535, std: 0.00506, params: {‘min_samples_split‘: 6, ‘n_estimators‘: 10},
  mean: 0.80446, std: 0.00399, params: {‘min_samples_split‘: 6, ‘n_estimators‘: 50},
  mean: 0.80688, std: 0.00424, params: {‘min_samples_split‘: 6, ‘n_estimators‘: 100},
  mean: 0.78754, std: 0.00552, params: {‘min_samples_split‘: 9, ‘n_estimators‘: 10},
  mean: 0.80321, std: 0.00487, params: {‘min_samples_split‘: 9, ‘n_estimators‘: 50},
  mean: 0.80553, std: 0.00389, params: {‘min_samples_split‘: 9, ‘n_estimators‘: 100}],
 {‘min_samples_split‘: 3, ‘n_estimators‘: 100},
 0.8073224957136084)
使用得到的参数重新训练随机森林:
1 rfr = RandomForestRegressor( min_samples_split=3,n_estimators = 100,random_state = 42)
2 rfr.fit(x_train, y_train)
3 rfr.score(x_test, y_test)
结果为:
0.80908290496531576
1 pd.Series(rfr.feature_importances_, index = housing.feature_names).sort_values(ascending = False)
结果为:
MedInc        0.524257
AveOccup      0.137947
Latitude      0.090622
Longitude     0.089414
HouseAge      0.053970
AveRooms      0.044443
Population    0.030263
AveBedrms     0.029084
dtype: float64