maven搭建nexus私服在myeclipse中的使用
开始注明:下方的内容中个别图片是从几个网站中黏贴进来的,时间太长忘记注明来源了,原作者看见能提醒我下,我注明,抱歉!下方大多数是自己总结的,有些描述的比较细,只是论述了个人能理解的部分。如果不知道maven如果在myeclipse中配置,那么请看我上篇博文:"maven在myeclipse8.6中的配置"。
1、简介
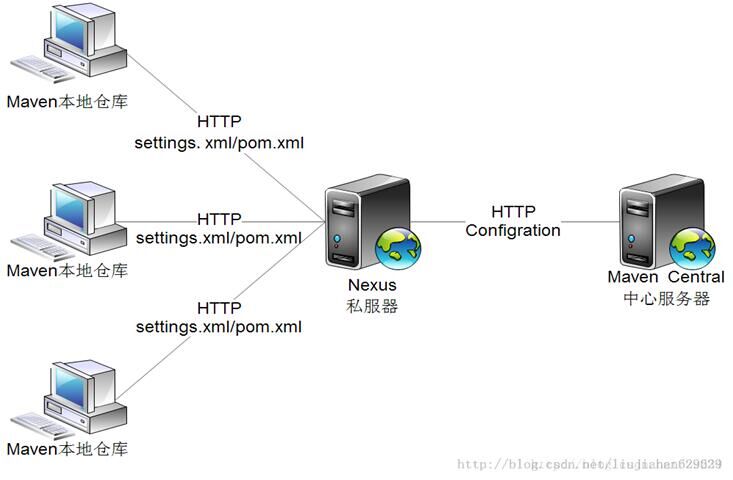
这里主要是对maven和nexus私服的使用。nexus私服,可以理解为在本地局域网建立了一个类似中央仓库的处理器,我们开始将资料下载到中央服务器中,然后在本地maven项目中直接访问中央服务器即可,这样既
节省了网络宽带也会加速项目的开发进度,图如下展示:
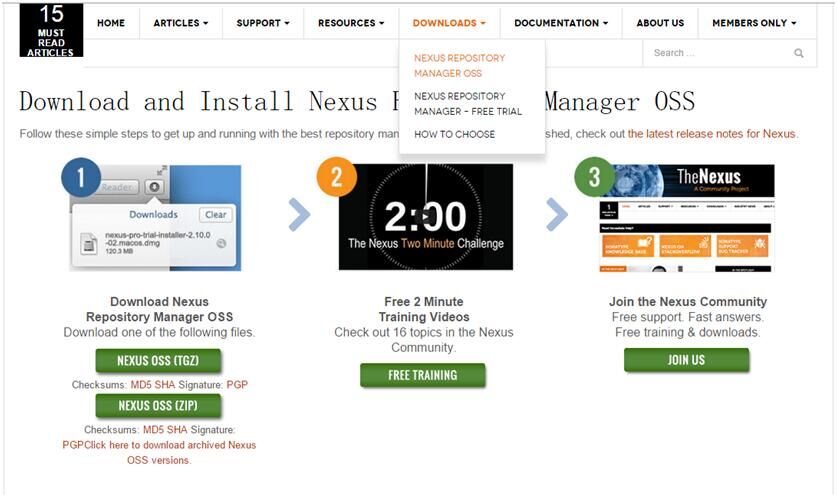
2、下载私服到本地并安装
http://www.sonatype.org/nexus/go/
点击NUEXS OSS(ZIP),会让输入邮箱,无视即可,如果不自动下载,那么复制URL链接到迅雷即可下载。
比如:https://sonatype-download.global.ssl.fastly.net/nexus/oss/nexus-latest-bundle.zip
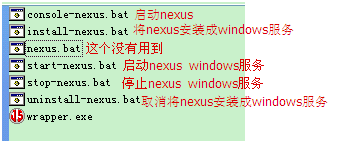
解压nexus-latest-bundle.zip,进入E:\nexus\nexus-latest-bundle-zip\nexus-2.11.4-01\bin\jsw\windows-x86-64
双击console-nexus.bat安装,会弹出DOC框,等着安装完,中间别关掉DOC框。
3、操作NEXUS
游览器中输入http://127.0.0.1:8081/nexus/,出现如下图所示就代表nexus已经启动成功。
8081为默认的端口号,要修改端口号可进入nexus-2.1.2-bundle\nexus-2.1.2\conf\打开nexus.properties文件,修改application-port属性值就可以了。
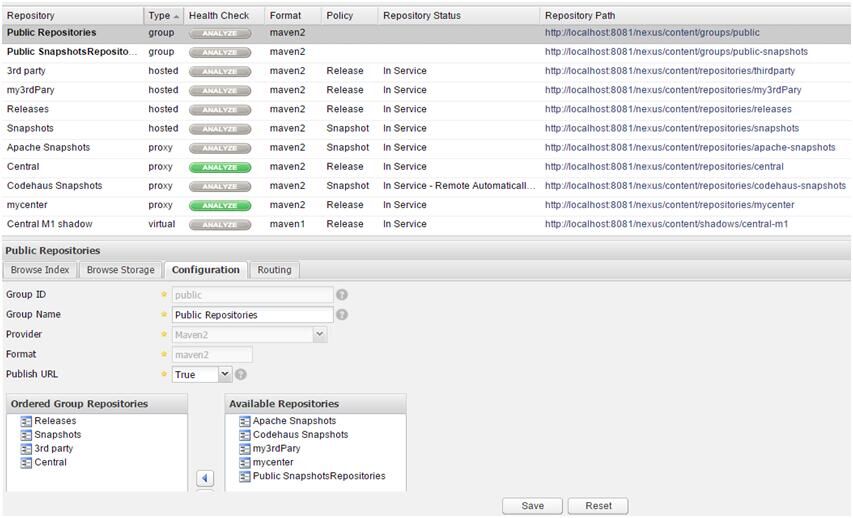
默认的用户名和密码:admin/admin123,登录后看到如下图所示: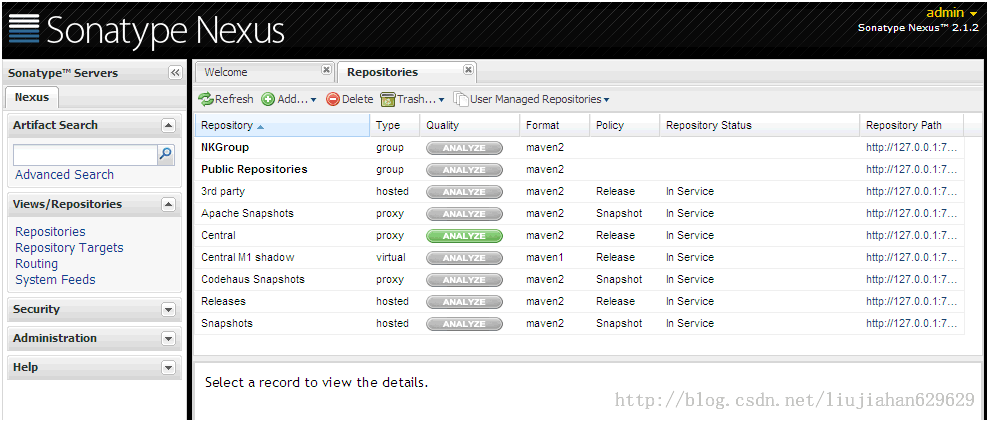
下面关于上述图中某几列的解释:
-------------------------------------------------------------------------------------
TYPE:
hosted 类型的仓库,内部项目的发布仓库
releases 内部的模块中release模块的发布仓库
snapshots 发布内部的SNAPSHOT模块的仓库
proxy 类型的仓库,从远程中央仓库中寻找数据的仓库
group 类型的仓库,组仓库用来方便我们开发人员进行设置的仓库
-------------------------------------------------------------------------------------
REPOSITORY:
PublicRepositories: 仓库组
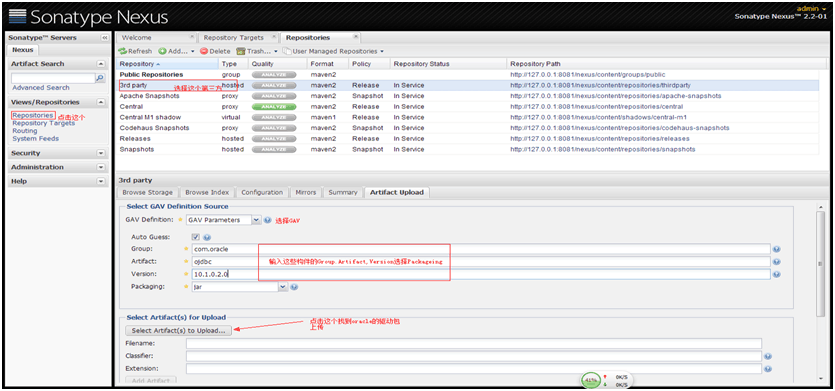
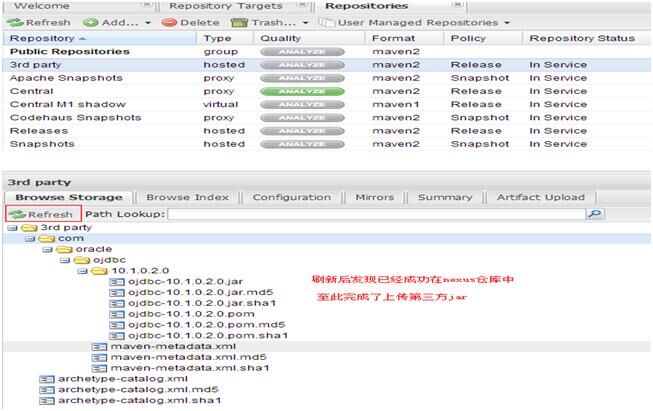
3rd party: 无法从公共仓库获得的第三方发布版本的构件仓库(个人理解操作:maven仓库中没有的,需要手工传到仓库中的jar包)
Apache Snapshots: 用了代理ApacheMaven仓库快照版本的构件仓库
Central: 用来代理maven中央仓库中发布版本构件的仓库(个人理解操作:maven仓库)
Central M1 shadow: 用于提供中央仓库中M1格式的发布版本的构件镜像仓库
Codehaus Snapshots: 用来代理CodehausMaven 仓库的快照版本构件的仓库
Releases: 用来部署管理内部的发布版本构件的宿主类型仓库
Snapshots:用来部署管理内部的快照版本构件的宿主类型仓库
-------------------------------------------------------------------------------------
理解:
一般用到的仓库种类是hosted、proxy。Hosted代表宿主仓库,用来发布一些第三方不允许的组件,比如oracle驱动、比如商业软件jar包。Proxy代表代理远程的仓库,最典型的就是Maven官方中央仓库、JBoss仓库等等。如果构建的Maven项目本地仓库没有依赖包,那么就会去这个代理站点去下载,那么如果代理站点也没有此依赖包,就回去远程中央仓库下载依赖,这些中央仓库就是proxy。代理站点下载成功后再下载至本机。笔者认为,其实Maven这个自带的默认仓库一般情况下已经够大多数项目使用了。特殊情况时在配置新的仓库,指定url即可,一般熟悉ExtJS的人操作这个Nexus都没什么问题,单词不是很难,不明白的查查单词基本差不多。就是如果Sonatype公司对其做了国际化的处理就更好了。
Nexus 中仓库组的概念是Maven没有的,在Maven看来,不管你是hosted也好,proxy也好,或者group也好,对我都是一样的,我只管根据 groupId,artifactId,version等信息向你要构件。为了方便Maven的配置,Nexus能够将多个仓库,hosted或者 proxy合并成一个group,这样,Maven只需要依赖于一个group,便能使用所有该group包含的仓库的内容。
-------------------------------------------------------------------------------------
4、nexus配置(maven的配置参考maven-使用部分。)
4、1利用现有nexus索引配置
需要的索引有Public Repositories,3rd party和Central。如果新建的nexus跟下述图中的属性不一致,需要调整。
--------------------------------------------------------------------------------------------
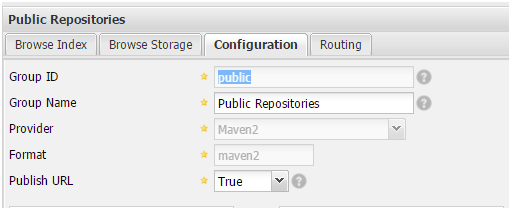
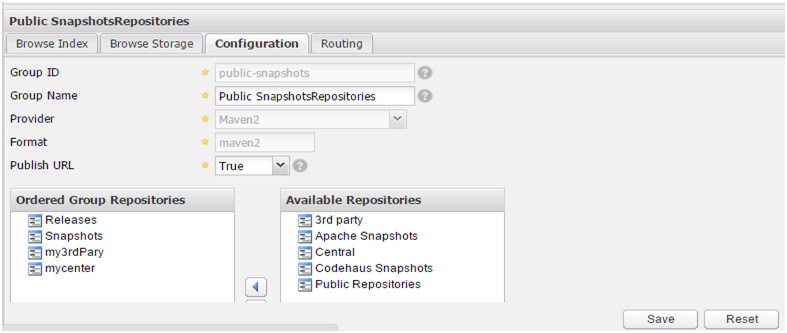
Public Repositories部分,需要注意左下方的顺序:
--------------------------------------------------------------------------------------------
3rd party部分:
在本地加入maven库中不存在的第三方jar包,比如oracle的jar包:
--------------------------------------------------------------------------------------------
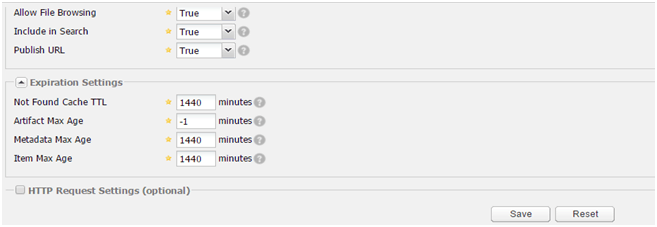
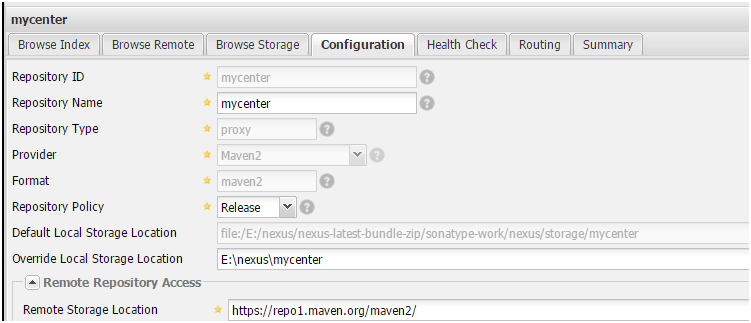
Central部分:
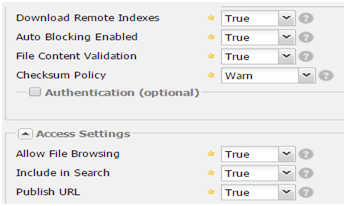
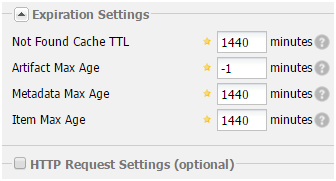
新搭建的neuxs环境只是一个空的仓库,需要手动和远程中心库进行同步,nexus默认是关闭远程索引下载,最重要的一件事情就是开启远程索引下载。把download remote indexes改成true。
保存后后台会运行一个任务,点击菜单栏的administration -- Scheduled Tasks选项即可看到有个任务在RUNNING。
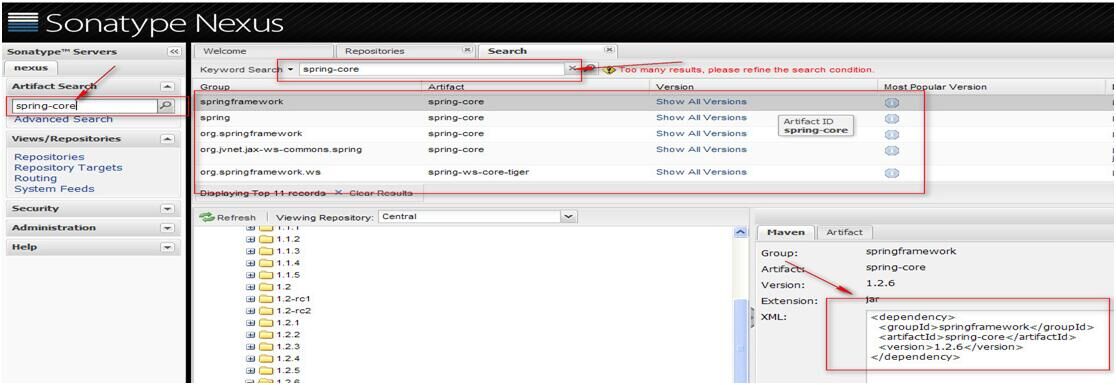
下载完成后,Maven索引就可以使用了,在搜索栏输入要搜索的项,就可以查到相关的信息。
或者在主页面搜索可跳转到上述页面。
都点击SAVE按钮之后,右键每一个REPOSITORY,进行repair index操作,这样才会去下载远程索引文件。
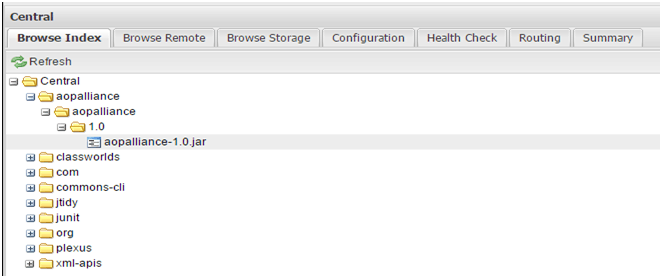
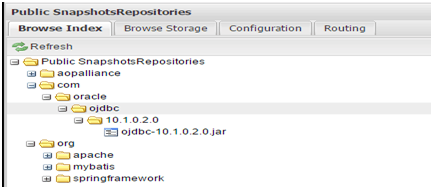
打开不同索引的browse index按钮,比如central的,会看到对应的jar包列表:
--------------------------------------------------------------------------------------------
在myeclipse中的maven工程配置pom.xml,大致内容:
<project xmlns="http://maven.apache.org/POM/4.0.0" xmlns:xsi="http://www.w3.org/2001/XMLSchema-instance" xsi:schemaLocation="http://maven.apache.org/POM/4.0.0 http://maven.apache.org/maven-v4_0_0.xsd">
  <modelVersion>4.0.0</modelVersion>
  <groupId>MavenTest01</groupId>
  <artifactId>MavenTest01</artifactId>
  <version>0.0.1-SNAPSHOT</version>
  <packaging>war</packaging>
  <!-- 版本属性 -->
<properties>
<!-- lib version setting -->
<spring.version>4.1.6.RELEASE</spring.version>
<mybatis.version>3.2.8</mybatis.version>
<mybatis-spring.version>1.2.2</mybatis-spring.version>
<mysql.driver.version>5.1.35</mysql.driver.version>
<druid.version>1.0.13</druid.version>
<!-- project util lib version setting -->
<util.version>0.2.2-SNAPSHOT</util.version>
<!-- util lib version setting -->
<log4j.version>1.2.17</log4j.version>
<slf4j.version>1.7.7</slf4j.version>
<jackson.version>2.5.1</jackson.version>
<commons-lang3.version>3.3.2</commons-lang3.version>
<commons-beanutils.version>1.9.2</commons-beanutils.version>
<httpClient.version>4.5</httpClient.version>
<gson.version>2.2.4</gson.version>
<junit.version>4.11</junit.version>
<!-- 编译jdk版本 -->
<jdk.version>1.7</jdk.version>
</properties>
<!-- 设定主仓库 -->
<repositories>
<!-- nexus私服 -->
<repository>
<id>nexus-repos</id>
<name>Team Nexus Repository</name>
<url>http://127.0.0.1:8081/nexus/content/groups/public-snapshots/</url>
<releases>
<enabled>true</enabled>
</releases>
<snapshots>
<enabled>true</enabled>
</snapshots>
</repository>
</repositories>
<!-- 设定插件仓库 -->
<pluginRepositories>
<pluginRepository>
<id>nexus-repos</id>
<name>Team Nexus Repository</name>
<url>http://127.0.0.1:8081/nexus/content/groups/public-snapshots/</url>
<releases>
<enabled>true</enabled>
</releases>
<snapshots>
<enabled>true</enabled>
</snapshots>
</pluginRepository>
</pluginRepositories>
<dependencies>
<!-- spring -->
<dependency>
<groupId>org.springframework</groupId>
<artifactId>spring-core</artifactId>
<version>${spring.version}</version>
<exclusions>
<exclusion>
<groupId>commons-logging</groupId>
<artifactId>commons-logging</artifactId>
</exclusion>
</exclusions>
</dependency>
<dependency>
<groupId>org.springframework</groupId>
<artifactId>spring-beans</artifactId>
<version>${spring.version}</version>
</dependency>
<dependency>
<groupId>org.springframework</groupId>
<artifactId>spring-context</artifactId>
<version>${spring.version}</version>
</dependency>
<dependency>
<groupId>org.springframework</groupId>
<artifactId>spring-aop</artifactId>
<version>${spring.version}</version>
</dependency>
<dependency>
  <groupId>com.oracle</groupId>
  <artifactId>odbc</artifactId>
  <version>10.1.0.2.0</version>
</dependency>
<dependency>
<groupId>org.mybatis</groupId>
<artifactId>mybatis-spring</artifactId>
<version>${mybatis-spring.version}</version>
</dependency>
</dependencies>
<build>
<plugins>
<plugin>
<groupId>org.apache.maven.plugins</groupId>
<artifactId>maven-compiler-plugin</artifactId>
<configuration>
<source>${jdk.version}</source>
<target>${jdk.version}</target>
</configuration>
</plugin>
</plugins>
<finalName>MavenTest01</finalName>
</build>
</project>
-------------------------------------------------------------------------------------------
注意:
其中的URL:<url>http://127.0.0.1:8081/nexus/content/groups/public/</url>
里面的public为:REPOSITORY的Public Repositories的Group ID:public
当maven工程编译成功之后,nexus库在本地的jar包路径为:E:\nexus\nexus-latest-bundle-zip\sonatype-work\nexus\storage\central
而maven工程下载到本地maven库的路径为:E:\maven\repository
这两者不要混淆。
--------------------------------------------------------------------------------------------
4、2新建本地nexus索引,大致内容同使用已存在的索引。
分别新建,group,hosted,proxy
hosted宿主仓库部分,根据3rd party操作:
proxy代理仓库部分,根据central部分操作:
group仓库组部分,根据Public Repositories操作,要注意左下角的添加顺序:
--------------------------------------------------------------------------------------------
注意,上述自己新建的部分弄完之后别忘记保存和repair index操作。
在maven项目中的pom.xml中修改URL为:<url>http://127.0.0.1:8081/nexus/content/groups/public-snapshots/</url>
当pom.xml改造完成之后,注意:maven项目会先从本地nexus仓库中取对应的jar包,如果本地仓库没有,那么就会去外网maven仓库中去取jar包。
--------------------------------------------------------------------------------------------
之后会在对应的group,hosted和proxy中查询到对应的jar包:
注意:可以发现group包括了hosted和proxy,这里面只对应maven工程对应pom.xml中的所有jar包。而my3rdParty是第三方的,而mycentral中包括maven库中所有的jar包。
本文出自 “你可以选择不平凡” 博客,请务必保留此出处http://ylcodes01.blog.51cto.com/5607366/1771650

