spring+hibernate+Struts2 整合(全注解及注意事项)
时间:2014-05-07 19:44:39
收藏:0
阅读:565
  最近帮同学做毕设,一个物流管理系统,一个点餐系统,用注解开发起来还是很快的,就是刚开始搭环境费了点事,今天把物流管理系统的一部分跟环境都贴出来,有什么不足的,请大神不吝赐教。

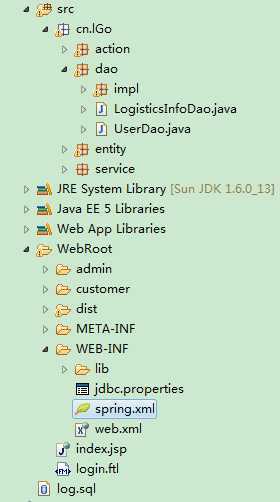
  1、结构如下

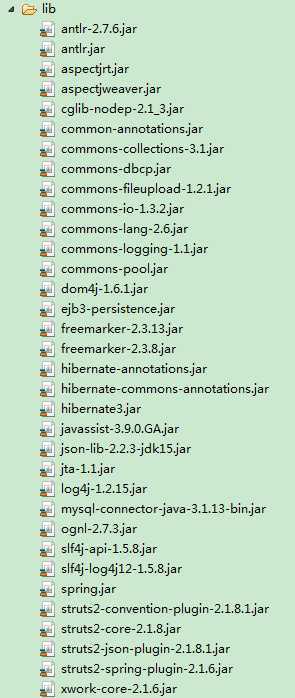
2、jar包如下

3、首先是spring.xml
<?xml version="1.0" encoding="UTF-8"?>
<beans xmlns="http://www.springframework.org/schema/beans"
    xmlns:xsi="http://www.w3.org/2001/XMLSchema-instance"
    xmlns:context="http://www.springframework.org/schema/context"
    xmlns:aop="http://www.springframework.org/schema/aop"
    xmlns:tx="http://www.springframework.org/schema/tx"
    xsi:schemaLocation="http://www.springframework.org/schema/beans
           http://www.springframework.org/schema/beans/spring-beans-2.5.xsd
           http://www.springframework.org/schema/context
           http://www.springframework.org/schema/context/spring-context-2.5.xsd
           http://www.springframework.org/schema/aop
           http://www.springframework.org/schema/aop/spring-aop-2.5.xsd
           http://www.springframework.org/schema/tx
           http://www.springframework.org/schema/tx/spring-tx-2.5.xsd">
    <context:annotation-config />
    <context:component-scan base-package="cn.lGo" />


    <context:property-placeholder location="WEB-INF/jdbc.properties" />

    <bean id="dataSource" destroy-method="close"
        class="org.apache.commons.dbcp.BasicDataSource">
        <property name="driverClassName"
            value="${jdbc.driverClassName}" />
        <property name="url" value="${jdbc.url}" />
        <property name="username" value="${jdbc.username}" />
        <property name="password" value="${jdbc.password}" />
    </bean>


    <bean id="sf"
        class="org.springframework.orm.hibernate3.annotation.AnnotationSessionFactoryBean">
        <property name="dataSource" ref="dataSource" />
         <property name="packagesToScan">
            <list>
                <value>cn.lGo.entity</value>

            </list>
        </property>
        <property name="hibernateProperties">
            <props>
                <prop key="hibernate.dialect">
                    org.hibernate.dialect.MySQLDialect
                </prop>
                <prop key="hibernate.show_sql">true</prop>
            </props>
        </property>
    </bean>

     <bean id="hibernateTemplate" class="org.springframework.orm.hibernate3.HibernateTemplate">
        <property name="sessionFactory" ref="sf"></property>
    </bean>

    <bean id="txManager"
        class="org.springframework.orm.hibernate3.HibernateTransactionManager">
        <property name="sessionFactory" ref="sf" />
    </bean>

<!-- 配置事务特性 -->
<tx:advice id="idAdvice" transaction-manager="txManager">
    <tx:attributes>
        <tx:method name="find*" propagation="NOT_SUPPORTED" read-only="true" isolation="READ_COMMITTED" />
            <tx:method name="save*" propagation="REQUIRED" isolation="READ_COMMITTED" />
            <tx:method name="delete*" propagation="REQUIRED" isolation="READ_COMMITTED" />
            <tx:method name="update*" propagation="REQUIRED" isolation="READ_COMMITTED" />
            <!-- Action中execute,暂时先用REQUIRED,以后真对查询操作,    修改以后在使用NOT_SUPPORTED -->
            <tx:method name="*" propagation="REQUIRED" />
    </tx:attributes>
</tx:advice>

<!-- Aop配置事务作用在那个位置:dao-->
<aop:config>
    <aop:pointcut expression="execution (* cn.lGo.dao..*.*(..))" id="curd"/>
    <aop:advisor advice-ref="idAdvice" pointcut-ref="curd"/>
</aop:config>
</beans>
  这个配置文件就不说了,在之前的文章中有提到过的。

4、web.xml
<?xml version="1.0" encoding="UTF-8"?>
<web-app version="2.5"
    xmlns="http://java.sun.com/xml/ns/javaee"
    xmlns:xsi="http://www.w3.org/2001/XMLSchema-instance"
    xsi:schemaLocation="http://java.sun.com/xml/ns/javaee
    http://java.sun.com/xml/ns/javaee/web-app_2_5.xsd">
  <display-name></display-name>
  <welcome-file-list>
    <welcome-file>login.ftl</welcome-file>
  </welcome-file-list>
  <context-param>
         <param-name>contextConfigLocation</param-name>
         <param-value>/WEB-INF/spring.xml</param-value>
  </context-param>
  <listener>
        <listener-class>org.springframework.web.context.ContextLoaderListener</listener-class>
    </listener>
  <filter>
        <filter-name>struts2</filter-name>
        <filter-class>org.apache.struts2.dispatcher.ng.filter.StrutsPrepareAndExecuteFilter</filter-class>
    </filter>

    <filter-mapping>
        <filter-name>struts2</filter-name>
        <url-pattern>/*</url-pattern>
    </filter-mapping>
</web-app>
上述中:
<context-param>
         <param-name>contextConfigLocation</param-name>
         <param-value>/WEB-INF/spring.xml</param-value>
  </context-param>
  <listener>
        <listener-class>org.springframework.web.context.ContextLoaderListener</listener-class>
    </listener>
指的是在项目启动时加载spring的配置文件
<filter>

        <filter-name>struts2</filter-name>
        <filter-class>org.apache.struts2.dispatcher.ng.filter.StrutsPrepareAndExecuteFilter</filter-class>
    </filter>

    <filter-mapping>
        <filter-name>struts2</filter-name>
        <url-pattern>/*</url-pattern>
    </filter-mapping>
指的是配置使用struts2注解

5、一个实体类
package cn.lGo.entity;

import javax.persistence.Entity;
import javax.persistence.Id;
import javax.persistence.Table;

@Entity
@Table(name="user")
public class User {

    private Integer id;
    private String name;
    private String password;
    private String address;
    @Id
    public Integer getId() {
        return id;
    }
    public void setId(Integer id) {
        this.id = id;
    }
    public String getName() {
        return name;
    }
    public void setName(String name) {
        this.name = name;
    }
    public String getPassword() {
        return password;
    }
    public void setPassword(String password) {
        this.password = password;
    }
    public String getAddress() {
        return address;
    }
    public void setAddress(String address) {
        this.address = address;
    }


}
其中要注意的问题是,如果数据库中有字段为user_name,而在实体类中写userName,是不会自动映射的,要加一个注解@Column(name="user_name")。
另外,还有一点实体类中使用hibernate注解时,不要使用数据库的敏感词

6、dao
package cn.lGo.dao;

import java.util.List;

import cn.lGo.entity.User;

public interface UserDao {

    /**
     * 根据用户名查找对应用户
     * @param userName
     * @return
     */
    public List<User> findUserByName(String userName);
}
7、daoImpl 实现类
package cn.lGo.dao.impl;

import java.util.List;

import javax.annotation.Resource;

import org.springframework.orm.hibernate3.HibernateTemplate;
import org.springframework.stereotype.Component;

import cn.lGo.dao.UserDao;
import cn.lGo.entity.User;
@Component
public class UserDaoImpl implements UserDao {
    private HibernateTemplate hibernateTemplate;

    public HibernateTemplate getHibernateTemplate() {
        return hibernateTemplate;
    }
    @Resource
    public void setHibernateTemplate(HibernateTemplate hibernateTemplate) {
        this.hibernateTemplate = hibernateTemplate;
    }

    @SuppressWarnings("unchecked")
    public List<User> findUserByName(String userName) {
        return hibernateTemplate.find("from User where name= ? ",new Object[]{userName});
    }

}
这个在spring注解呢篇中说过。
@Component 是将该类注册到spring中,如果没写属性,就会相当于 <bean name="userDaoImpl" ...   首字母小写
@Resource 注入,将sprin容器中name="hibernateTemplate"的 注入进去

8、service
package cn.lGo.service;

import java.util.List;

import javax.annotation.Resource;

import org.springframework.stereotype.Component;

import cn.lGo.dao.UserDao;
import cn.lGo.entity.User;

@Component
public class UserService {

    private UserDao userDao;


    public UserDao getUserDao() {
        return userDao;
    }

    @Resource(name="userDaoImpl")
    public void setUserDao(UserDao userDao) {
        this.userDao = userDao;
    }


    public List<User> findUserByName(String userName){
        return userDao.findUserByName(userName);
    }
}
@Component还是把name="userService"的bean注册到spring容器
这个@Resource是将name="userDaoImpl"注给userDao,面向接口的编程,更具有灵活性

9、Action
package cn.lGo.action;

import java.util.List;

import javax.annotation.Resource;

import org.apache.struts2.convention.annotation.Namespace;
import org.apache.struts2.convention.annotation.ParentPackage;
import org.apache.struts2.convention.annotation.Result;
import org.apache.struts2.convention.annotation.Results;
import org.springframework.stereotype.Component;

import com.opensymphony.xwork2.ActionContext;

import cn.lGo.entity.User;
import cn.lGo.service.UserService;

@Component("loginAction")
@Namespace(value="/checkUser")
@ParentPackage("json-default")
@Results({
    @Result(name="success",type="json")
})
public class LoginAction {

    private String userName;
    private String password;
    private String flag;
    private UserService userService;

    public String getFlag() {
        return flag;
    }
    public void setFlag(String flag) {
        this.flag = flag;
    }
    @Resource
    public void setUserService(UserService userService) {
        this.userService = userService;
    }

    public String getUserName() {
        return userName;
    }
    public void setUserName(String userName) {
        this.userName = userName;
    }
    public String getPassword() {
        return password;
    }
    public void setPassword(String password) {
        this.password = password;
    }
    public String execute(){
        System.out.println("LoginAction.execute()");
        List<User> listUser=userService.findUserByName(userName);
        if(listUser.size()==0){
            flag="0";
        }else{
            if(listUser.get(0).getPassword().equals(password)){
                flag="2";
                User user=new User();
                user.setName(userName);
                user.setPassword(password);
                user.setAddress(listUser.get(0).getAddress());
                ActionContext.getContext().getSession().put("user", user);
            }else{
                flag="1";
            }
        }
        return "success";
    }

}
@Component("loginAction")将action注册到容器,并不是直接通过struts2访问的,他会根据@Namespace(value="/checkUser"),找到action的type(地址),通过spring容器反射出一个这样的action。
另外还需要很注意的一点!!!!! 在action中写的注入是不能有get()方法的,只能由set(),就像文中userService一样,具体不清楚,还望大婶赐教。。。。

10、页面  login.ftl
<!DOCTYPE html>
<html>
  <head>
    <title>Bootstrap 101 Template</title>
    <meta http-equiv="Content-Type" content="text/html; charset=UTF-8"/>
    <meta name="viewport" content="width=device-width, initial-scale=1.0">
    <!-- jQuery (necessary for Bootstrap‘s JavaScript plugins) -->
    <script src="dist/js/jquery-1.7.1.min.js"></script>
    <!-- Include all compiled plugins (below), or include individual files as needed -->
    <script src="dist/js/bootstrap.min.js"></script>
    <!-- Bootstrap -->
    <link rel="stylesheet" href="dist/css/bootstrap.min.css">
    <link rel="stylesheet" href="dist/css/bootstrap-theme.css">

     <style>
    body{
      text-align: center;
    }

 </style>
  <script type="text/javascript">
      $(function(){
          $("#sign").click(function(){
              var name=$("#userName").val();
              var password=$("#password").val();
              if(name==""||password==""){
                  alert("用户名或密码不能为空");
                  $("#userName").val("");
                  $("#password").val("");
                  return;
              }
              if(name=="admin"&&password=="admin"){
                  location.href="admin/main.ftl";
                  return;
              }
              $.ajax({
                  "url":"checkUser/login",
                  "type":"post",
                  "data":{
                      "userName":name,
                      "password":password
                  },
                  "dataType":"json",
                  "success":function(data){
                      if(data.flag=="0"){
                          $("#userName").val("");
                          $("#password").val("");
                          alert("用户名不存在,请重新输入");
                          return;
                      }else if(data.flag=="1"){
                          $("#userName").val("");
                          $("#password").val("");
                          alert("密码不正确,请重新输入");
                          return;
                      }else if(data.flag=="2"){
                          location.href="customer/userMain.ftl";
                      }
                  }
              });
          });
      });
  </script>
  </head>
  <body >

    <div class="container" id="div1">
      <p class="navbar-text navbar-left" style="font-weight:bold;">欢迎使用1Go物流管理系统</p>
      <div class="jumbotron" >
        <form class="form-inline" role="form" >
          <div class="form-group">
            <input type="text" class="form-control" id="userName" placeholder="UserName">
          </div>
          <div class="form-group">
            <input type="password" class="form-control" id="password" placeholder="Password">
          </div>
          <button type="button" class="btn btn-default" id="sign">Sign in</button>
        </form>
      </div>

    </div>


  </body>
</html>
前台页面用的是BootStrap3来做的,感觉有种高大上的感觉,hiahiahiahia


这是该项目中的登录部分,麻雀虽小五脏俱全,渐渐的感觉生活少了些刺激感,嫩们怎么寻找生活的刺激。。。
评论(0)

